10 Best Tomato Trellis Ideas for Massive Harvests in Small Spaces
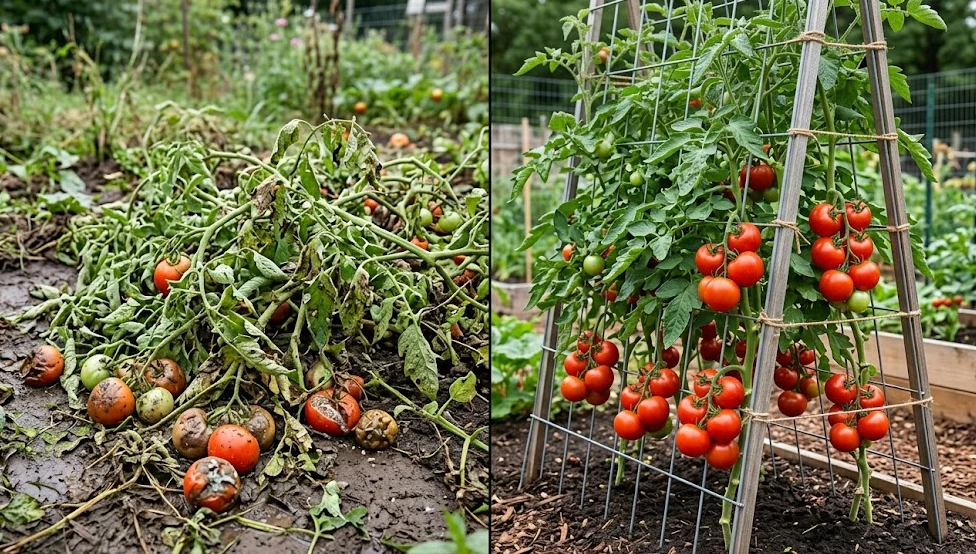
There is nothing quite like the taste of a sun-warmed tomato fresh from your own garden. However, there is also nothing more frustrating than watching your beautiful tomato plants collapse under their own weight, turning into a tangled mess of vines, mud, and rotting fruit.
If you have ever walked into your garden in July to find a “tomato jungle” where you can’t reach the fruit, you know the struggle. The secret to avoiding this chaos isn’t just better soil or fertilizer it is proper support.
A good tomato trellis system is the backbone of a productive garden. It keeps your plants organized, maximizes your growing space, and significantly increases your harvest. Whether you have a tiny balcony, a raised bed, or a large backyard farm, there is a trellis design that fits your needs perfectly.
In this comprehensive guide, we will explore the best tomato trellis ideas used by master gardeners. From cheap DIY solutions to heavy-duty setups that last for decades, you will find the perfect system to keep your tomatoes upright, healthy, and easy to pick.
- Why Every Tomato Plant Needs Support
- The Golden Rule: Determinate vs. Indeterminate Tomatoes
- Top Tomato Trellis Ideas for Every Gardener
- How to Secure Your Trellis Against Wind
- Pruning: The Secret to Trellis Success
- Common Trellising Mistakes to Avoid
- Which System Is Right for You?
- Frequently Asked Questions (FAQ)
Why Every Tomato Plant Needs Support
Many beginners make the mistake of letting their tomato plants sprawl on the ground. While this might work in the wild, it is a recipe for disaster in a home garden.
Supporting your tomatoes vertically offers four undeniable benefits that directly impact your success.
1. Disease Prevention
Fungal diseases like Early Blight and Septoria Leaf Spot are the enemies of tomato growers. These pathogens live in the soil.
When tomato leaves touch the ground or when rain splashes soil onto the lower leaves, these diseases infect the plant. A trellis lifts the foliage off the ground, creating a safety gap that keeps your plants healthier for longer.
2. Improved Airflow
Tomatoes need to breathe. A dense, tangled mat of leaves traps moisture, creating a humid environment where mold thrives.
By training the plant upwards, you allow wind and air to circulate through the leaves. This dries out wet foliage quickly after rain, drastically reducing the risk of fungal infections.
3. Maximizing Garden Space
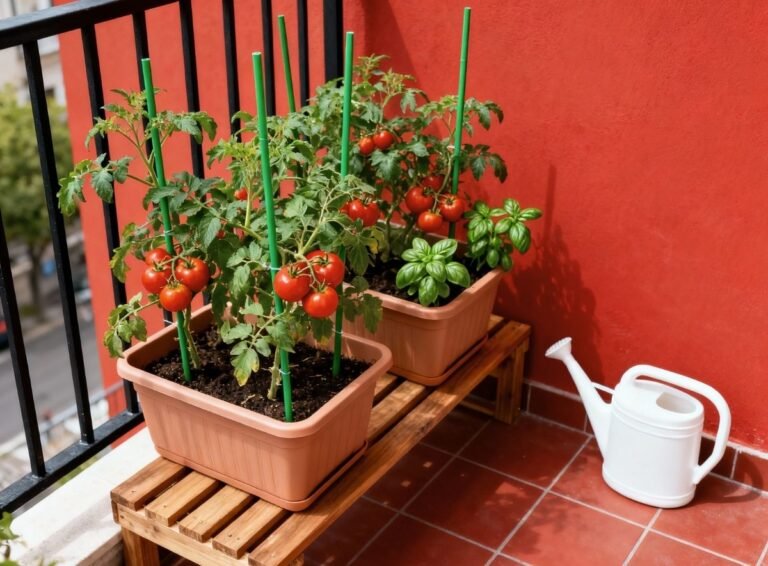
This is a game-changer for urban gardeners. If you let a tomato plant sprawl, it can take up 10 to 15 square feet of ground space.
If you trellis it vertically, that same plant only needs 1 to 2 square feet. Vertical gardening allows you to grow more varieties in the same footprint, effectively multiplying your garden’s size.
4. Easier Harvesting
No one enjoys hunting for tomatoes on their hands and knees in the mud. A trellis keeps the fruit at eye and hand level.
You can easily spot ripe tomatoes, and because they are hanging freely, they grow evenly without the flat, rotten spots often found on ground-dwelling fruit.
The Golden Rule: Determinate vs. Indeterminate Tomatoes
Before you buy supplies or start building, you must know what kind of tomato you are growing. Choosing the wrong trellis for your specific tomato variety is the most common reason for failure.
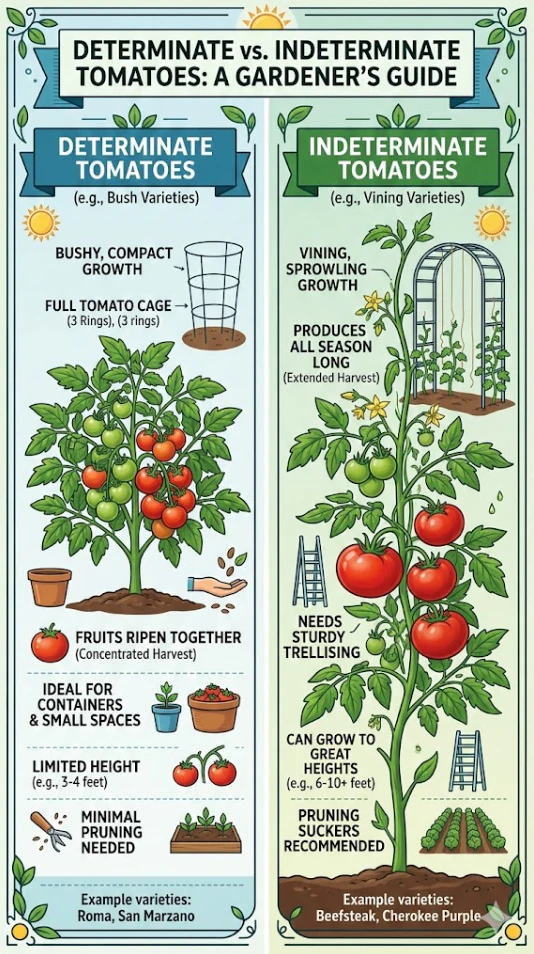
Determinate Tomatoes (Bush Varieties)
These plants are genetically programmed to grow to a specific height (usually 3 to 4 feet). They stop growing once they set fruit, and they ripen their entire crop within a short 2-3 week window.
- Trellis Need: They need moderate support. Since they don’t grow forever, you don’t need a 7-foot tower. Standard cages or the “Florida Weave” work perfectly.
- Examples: Roma, Celebrity, Patio varieties.
Indeterminate Tomatoes (Vining Varieties)
Most heirloom and cherry tomatoes fall into this category. These plants are vines that never stop growing until the frost kills them. In healthy soil, they can easily reach 8 to 10 feet in height.
- Trellis Need: They require serious, heavy-duty height. Those small, cone-shaped cages sold at hardware stores will topple over by mid-summer. You need tall trellises, arches, or string systems.
- Examples: Brandywine, Cherokee Purple, Sungold, Better Boy.
Top Tomato Trellis Ideas for Every Gardener
Now that you understand the “why” and the “what,” let’s look at the “how.” Here are the most effective trellis systems, ranging from simple DIY projects to professional-grade setups.
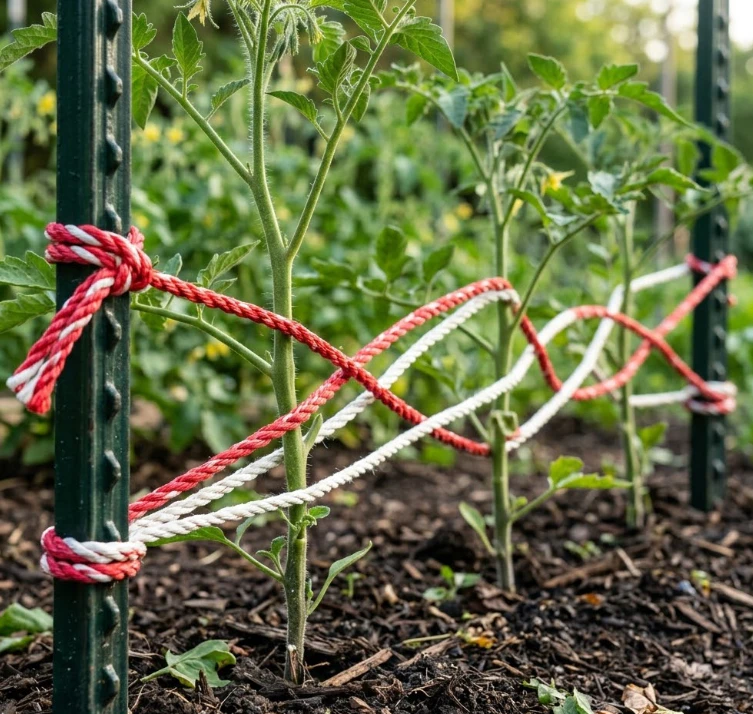
1. The Florida Weave (Best for Rows)
If you are growing a long row of tomatoes, the Florida Weave (also known as the Basket Weave) is the most economical and time-saving method. Instead of building a trellis for each individual plant, you build one system for the entire row.
How It Works: You place strong stakes (metal T-posts or wooden stakes) at both ends of your row and between every 2-3 plants. Then, using heavy-duty twine, you weave the string back and forth between the posts, “sandwiching” the tomato plants in between two lines of string. As the plants grow, you add another layer of string every 6-8 inches.
Materials Needed:
- Metal T-posts or sturdy 2×2 wooden stakes (at least 6-7 feet tall).
- Tomato twine (must be UV resistant and non-stretching).
- A hammer or post driver.
Pros:
- Cost-effective: You use far fewer materials per plant compared to cages.
- Fast installation: You can support 10 plants in minutes.
- Space-saving: Keeps plants in a tidy, narrow hedge.
Cons:
- It requires sturdy posts; if the end posts lean, the whole row loses tension.
- Not ideal for single plants scattered around the garden.
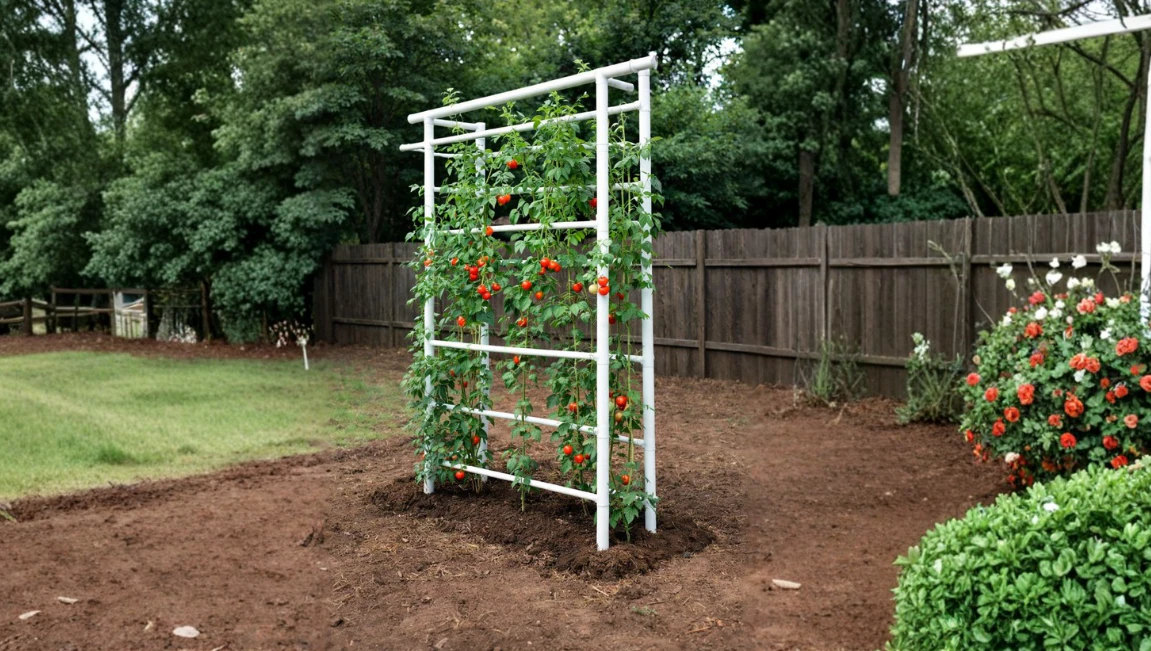
2. The Vertical String Trellis (Best for High Yields)
This is the method used by professional greenhouse growers and market farmers. It is arguably the best system for indeterminate varieties if you want to maximize production and fruit quality.
How It Works: This system requires an overhead support—this could be a wooden frame, a metal conduit pipe, or the rafters of a greenhouse.
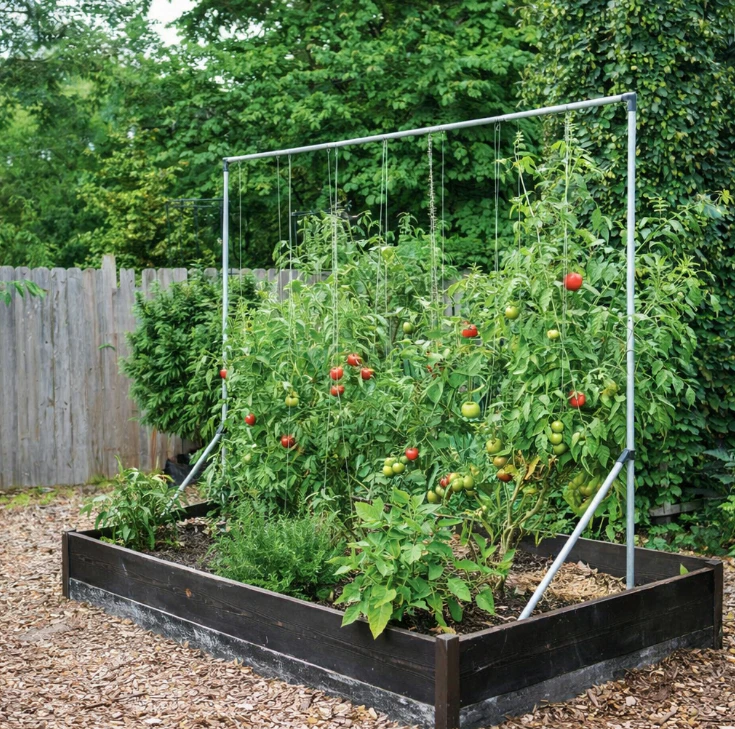
A durable string hangs down from the top bar to the base of each tomato plant. As the tomato grows, you simply wrap or “clip” the main stem of the plant to the string. The plant climbs the string just like a bean pole.
Materials Needed:
- A top support bar (usually 7-8 feet high).
- Tomato clips (plastic clips that snap onto the string) or just the twine itself.
- Bailing twine or specialized tomato string.
The “Single Leader” Technique: To make this work, you must prune your tomatoes to a “single leader.” This means cutting off all the suckers (side shoots) so the plant puts all its energy into one main vine. This results in larger fruit and keeps the plant manageable.
Pros:
- Incredible airflow: Disease issues are almost non-existent.
- High density: You can plant tomatoes as close as 12-18 inches apart because they grow vertical, not wide.
- Easy access: Fruit is extremely easy to see and pick.
Cons:
- Requires building a tall frame first.
- High maintenance: You must prune and wind the plants once a week.
3. The Cattle Panel Arch (The “Forever” Trellis)
If you want to build a trellis once and never worry about it again for 20 years, the Cattle Panel Arch is the answer. It is functional, beautiful, and adds architectural structure to your garden.
How It Works: Cattle panels are heavy-duty galvanized wire fencing sold at farm supply stores. They are typically 16 feet long and 50 inches wide. Because they are stiff, you can bend them into an arch shape. By securing one end to the ground (or a raised bed) and the other end about 4-6 feet away, you create a sturdy tunnel.
Tomatoes are planted at the base of the arch. As they grow, you simply tuck the branches into the wire squares. The plants will eventually meet at the top, creating a tunnel of hanging tomatoes.
Materials Needed:
- 16-foot Cattle Panel (usually around $25-$35).
- 4 metal T-posts (to anchor the panel corners).
- Zip ties or heavy wire.
Pros:
- Indestructible: Can hold hundreds of pounds of fruit without bending.
- No pruning required: You can let the plants go wild; the panel will support them.
- Harvesting magic: The tomatoes hang down inside the tunnel, making picking delightful.
- Dual purpose: You can grow shade-loving crops like lettuce underneath the arch in summer.
Cons:
- Transporting a 16-foot panel from the store can be difficult without a truck.
- It requires a permanent or semi-permanent dedicated space.
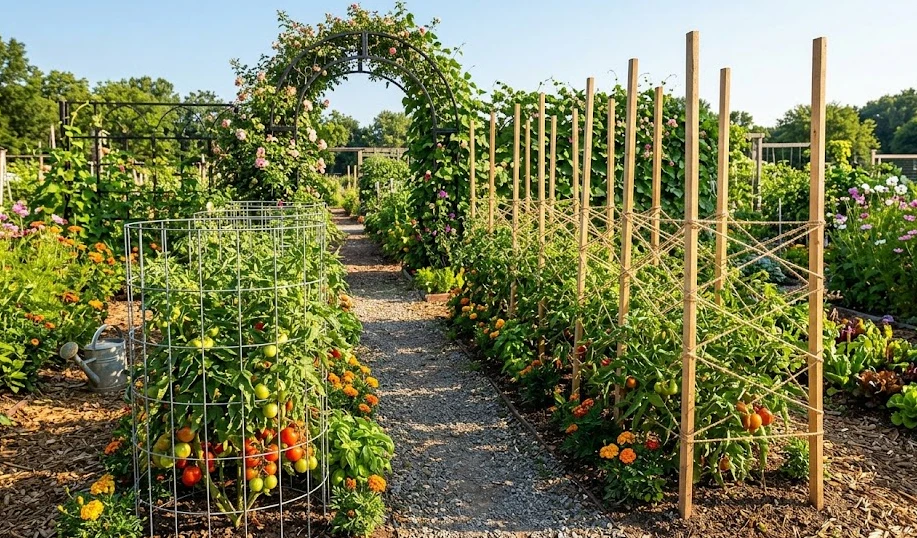
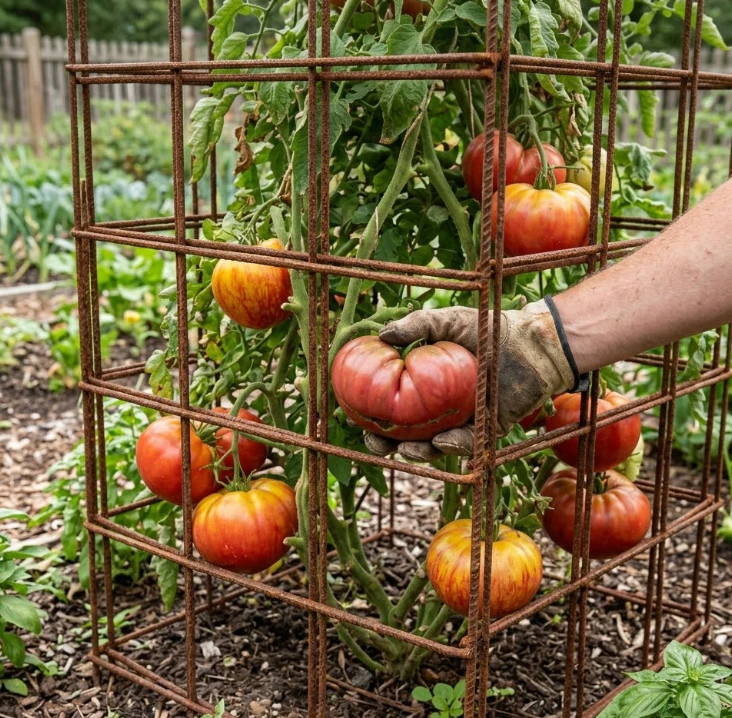
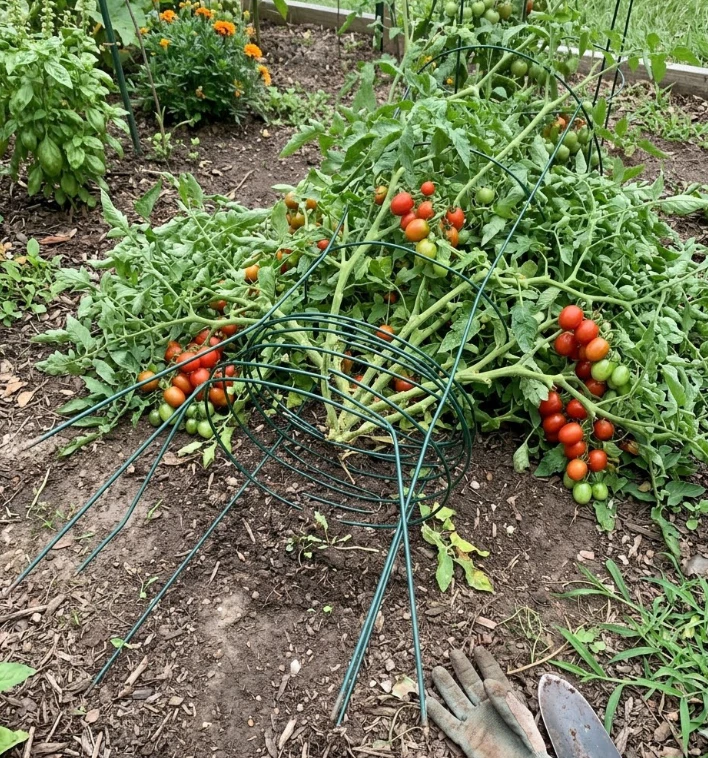
4. DIY Concrete Mesh Cages
Forget those flimsy $5 cone cages that bend and rust after one season. The “remesh” or concrete reinforcing wire cage is the gold standard for gardeners who prefer the cage method but want something that actually works for big plants.
How It Works: Concrete reinforcing wire comes in large rolls and has 6-inch square openings. You cut a length of wire (usually 5-6 feet), roll it into a cylinder, and secure the ends. This creates a sturdy, open cylinder that is about 18-24 inches in diameter and 5 feet tall.
You place this cage over your seedling. As the plant grows, the wire supports the branches. The large 6-inch openings are crucial because they allow you to reach your hand inside to pick fruit something you cannot do with cheap hardware store cages.
Materials Needed:
- Roll of concrete reinforcing wire (Remesh).
- Bolt cutters or wire cutters.
- Heavy-duty gloves (the wire can be sharp).
- A stake or two to anchor the cage to the ground so it doesn’t blow over in storms.
Pros:
- Great for bushy growth: You don’t need to prune heavily; the cage supports a multi-stemmed plant.
- Long-lasting: These cages can last 10-15 years if stored properly in winter.
- Excellent airflow: The wide spacing allows wind to pass through easily.
Cons:
- Storage: They are bulky and take up space in the shed during winter.
- Rust: The wire will rust over time (turning a reddish-brown), though this is purely cosmetic and doesn’t hurt the plants.
5. The A-Frame Trellis
The A-Frame is a classic design that is incredibly stable and adds a nice geometric look to raised beds. It essentially looks like a ladder or a swing set frame opened up.
How It Works: You construct two “A” shapes using wood or metal for the ends of your bed and connect them with a top bar. You can then run horizontal strings across the frame, attach chicken wire, or use a climbing net. Tomatoes can be planted on both sides of the “A” and trained to climb up the slope.
Materials Needed:
- 2×4 lumber or bamboo poles.
- Screws or sturdy lashings.
- Trellis netting or twine.
Pros:
- Stability: The wide base makes it almost impossible for wind to knock over.
- Space efficient: It utilizes vertical space above the bed while leaving the center open for airflow.
- Foldable: If you use hinges at the top of the “A”, you can fold it flat for winter storage.
Cons:
- If the angle is too steep, the plants might lean heavily on the lower foliage.
- It requires some basic carpentry skills to build.
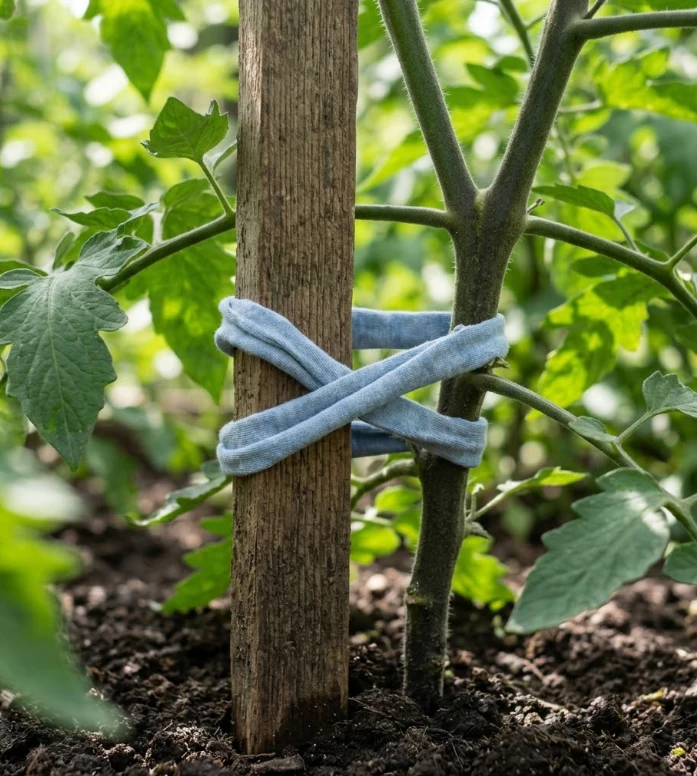
6. The Single Stake Method (Simple & Cheap)
This is the most traditional method of supporting tomatoes and is perfect for gardeners on a tight budget or those with very limited space. While it sounds basic, doing it incorrectly can damage your plants.
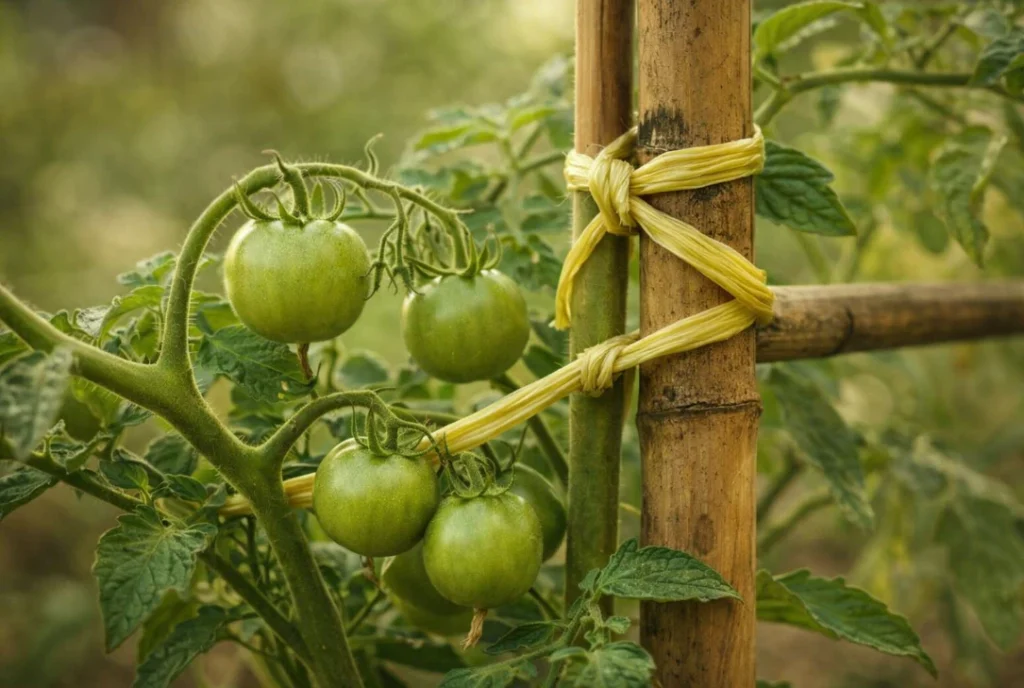
How It Works: You drive a single, strong stake into the ground about 3–4 inches away from the base of the tomato plant. As the plant grows, you use soft ties (like strips of old T-shirts, pantyhose, or garden velcro) to secure the main stem to the stake every 6–8 inches.
Materials Needed:
- Stakes: Wooden stakes (at least 2×2 inches thick) or metal rebar. Bamboo poles can work but must be thick.
- Height: The stake needs to be at least 6–7 feet tall. Remember, 1 foot will go into the ground.
- Ties: Soft material that won’t cut into the stem.
Crucial Maintenance: The Single Stake method only works if you prune aggressively. You must maintain the plant as a single or double-stemmed vine. If you let it become a bush, the single pole will not be able to support the weight, and the plant will slide down or topple the stake.
Pros:
- Cheap and easy: You probably have materials lying around.
- Small footprint: Takes up the least amount of ground space.
- Mobile: If you grow in pots, you can stick a stake directly into the container.
Cons:
- High maintenance: Requires constant pruning and tying (at least once a week).
- Lower yield: Because you prune so much, you get fewer tomatoes per plant (though the individual fruits are often larger).
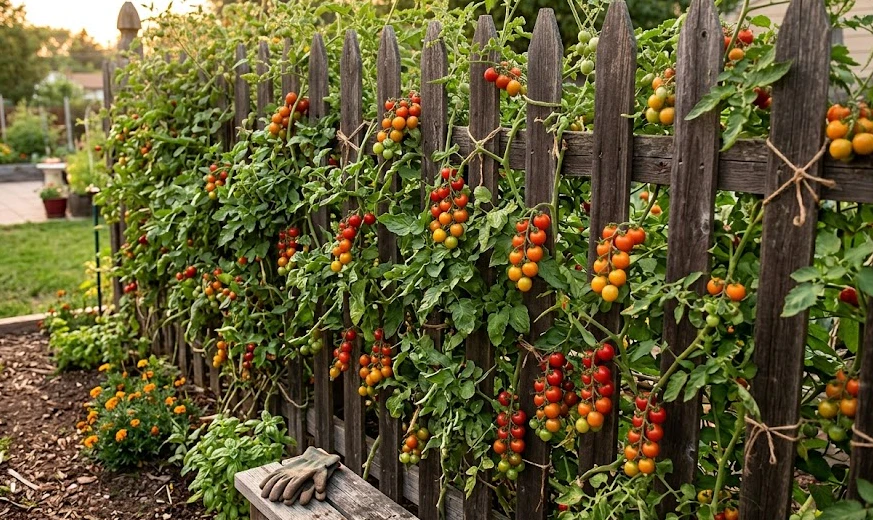
7. The Existing Fence Trellis (The Lazy Gardener’s Hack)
Why build something new if you already have a structure? If your garden is surrounded by a chain-link fence, a wooden picket fence, or even a deck railing, you have a ready-made trellis waiting to be used.
How It Works: Plant your tomatoes about 12 inches away from the fence. As they grow, lean them towards the fence and use soft twine or zip ties to secure the branches to the fence links or slats.
Best For: Cherry tomatoes. Since cherry tomato vines are vigorous and lightweight, they love scrambling up and across chain-link fences. They can turn a boring metal fence into a wall of green and red.
Pros:
- Zero cost: No materials to buy.
- Stability: Fences are anchored in concrete, so they will never blow over.
- Decoration: Hides ugly fences with lush greenery.
Cons:
- Airflow: Solid wooden fences can block wind, potentially increasing fungal issues on the side facing the wood.
- Access: If the fence is on your property line, make sure you can reach the other side to harvest fruit that grows through the holes!
How to Secure Your Trellis Against Wind
Building a trellis is one thing; keeping it standing during a summer thunderstorm is another. A tomato plant laden with fruit acts like a giant sail in the wind. If your supports aren’t anchored, the whole system can collapse, snapping the stems of your prized plants.
Here are three pro tips to “storm-proof” your trellis:
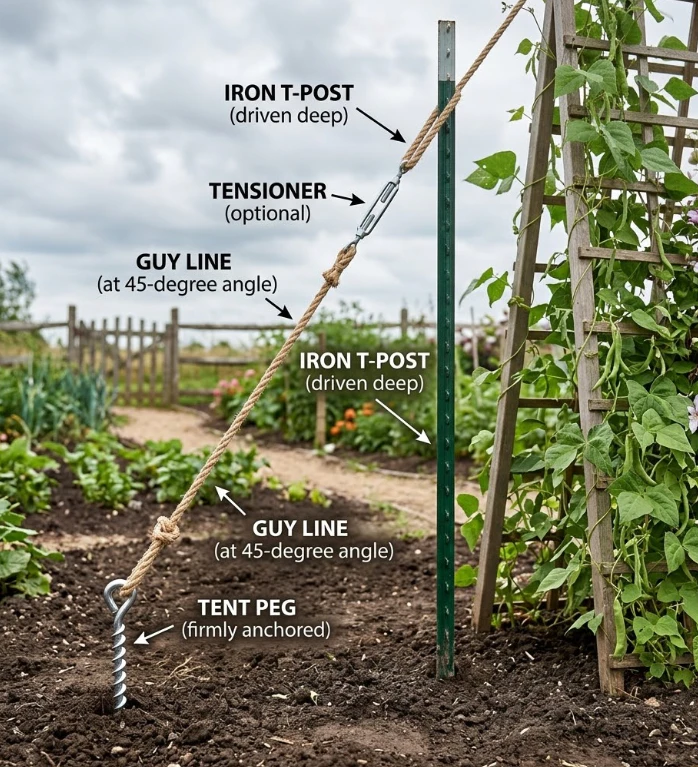
1. Go Deep: Whether you are using T-posts, wooden stakes, or rebar, depth is your friend. Pounding a stake 6 inches into the ground is not enough. Aim for at least 12 to 18 inches deep. Wet soil becomes soft, and shallow stakes will pull right out in a storm.

- Package Contents: 30 Cross Head Hubs, 30 Washers, 30 Plastic Expansion Anchors, 1/8” Dia 150 ft Wire Ropes, 1 Drill bit,…
- Sturdy & Durable: Made of premium T316 stainless steel, SPECILITE wire trellis kit is waterproof, rustproof and anti-cor…
- Optimized Airflow Control: Maintains up to 2.4 inch gap from walls after installation, effectively enhancing airflow to …
2. The 45-Degree Angle: If you are using a string trellis or an A-frame, use “guy lines” (anchoring ropes) pegged into the ground at a 45-degree angle from the top of the structure. This is the same physics used to secure camping tents. It provides counter-tension that prevents the structure from tipping.
3. Connect Your Cages: If you are using individual wire cages, they are prone to tipping. A simple trick is to drive a single metal T-post at each end of your row of cages. Then, run a strong wire or rope connecting all the cages together and tie them to the end posts. This makes them act as one solid unit if the wind pushes one, the others hold it up.
Pruning: The Secret to Trellis Success
No matter which trellis system you choose (except for the Cattle Panel Arch), you will need to do some pruning. Pruning manages the chaos and directs the plant’s energy into fruit production rather than endless leaves.
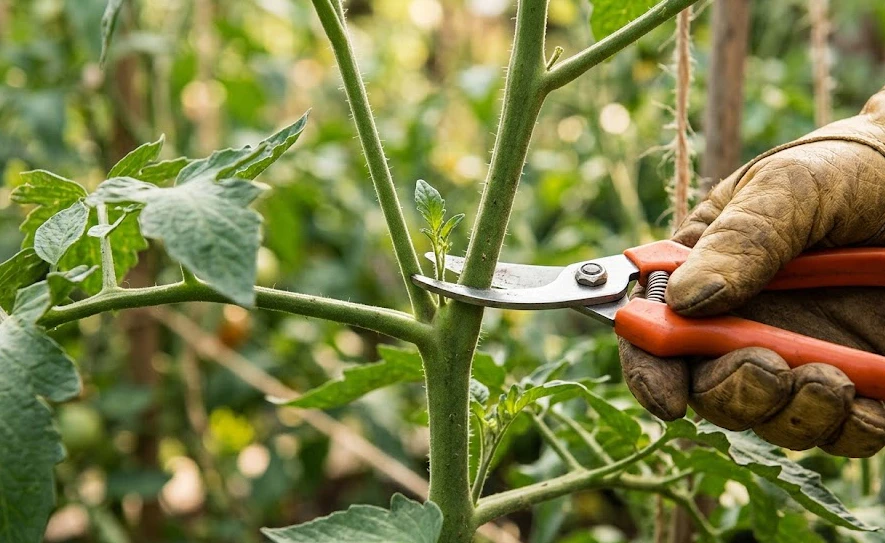
Identifying “Suckers”: Stand in front of your tomato plant. Look at the main stem. Now look at a leaf branch sticking out. In the “armpit” (the V-shape) between the main stem and the leaf branch, you will see a tiny new sprout growing at a 45-degree angle. This is a sucker.
- For Vertical String / Single Stake: Pinch off every sucker you see. You want only one main vine.
- For Florida Weave: Prune the suckers at the bottom 10 inches of the plant to improve airflow, but leave the higher ones to create a bushy wall.
- For Cages: Prune lightly. Remove the bottom suckers to prevent soil splash, but let the upper suckers grow to fill the cage.
When to Prune: Start early. It is easy to pinch off a sucker when it is 1 inch long. If you wait until it is a 2-foot long thick branch, cutting it off leaves a large open wound that can invite disease.
Common Trellising Mistakes to Avoid
Even experienced gardeners make blunders. Avoid these pitfalls to save yourself a mid-season headache.
Mistake #1: Installing the Trellis Too Late Do not wait until your plant is 2 feet tall and flopping over to think about support. Trying to wrestle a large, brittle tomato plant into a cage or weaving it through strings usually results in snapped branches.
Fix: Install your trellis system on the same day you plant your seedlings.
Mistake #2: Using Material That Is Too Weak Bamboo sticks from the dollar store might look cute, but a mature indeterminate tomato plant can weigh 30-50 pounds when wet with rain. Thin sticks will snap.
Fix: Always overestimate the strength you need. Use metal T-posts, thick wood (2×2 minimum), or heavy-gauge wire.
Mistake #3: Tying Too Tight Tomato stems expand significantly as they grow—sometimes becoming as thick as a thumb or broom handle. If you use a thin wire or tie it too tightly, it will cut into the stem, choking off the flow of water and nutrients (this is called girdling).
Fix: Use wide, soft ties and leave a little wiggle room.
Mistake #4: Ignoring Height Buying a 3-foot trellis for an indeterminate variety like ‘Sungold’ is useless. By July, the plant will grow over the top, flop down, and likely snap the trellis.
Fix: Check your seed packet. If it says “Indeterminate,” build at least 6-7 feet high. If it says “Determinate,” 3-4 feet is fine.
Which System Is Right for You?
Choosing the best tomato trellis boils down to your space, budget, and personality.
- The Busy Gardener: Go with Cattle Panel Arches or Concrete Mesh Cages. They require the least amount of pruning and maintenance. Set it and forget it.
- The Urban/Small Space Gardener: The Vertical String Method or Single Stake is your best friend. You can fit the most plants in the smallest footprint.
- The Large Harvest Farmer: If you are planting 20+ plants for canning sauce, the Florida Weave is unbeatable for speed and efficiency.
Ultimately, the “best” trellis is the one that gets your tomatoes off the ground. A well-supported plant is a happy plant. It gets more sun, catches more breeze, and stays cleaner. In return, it rewards you with the ultimate prize: a bumper crop of juicy, flawless tomatoes that taste like summer sunshine.
So, grab your gloves, pick a design, and give your tomatoes the support they deserve. Your future BLT sandwiches will thank you!
Frequently Asked Questions (FAQ)
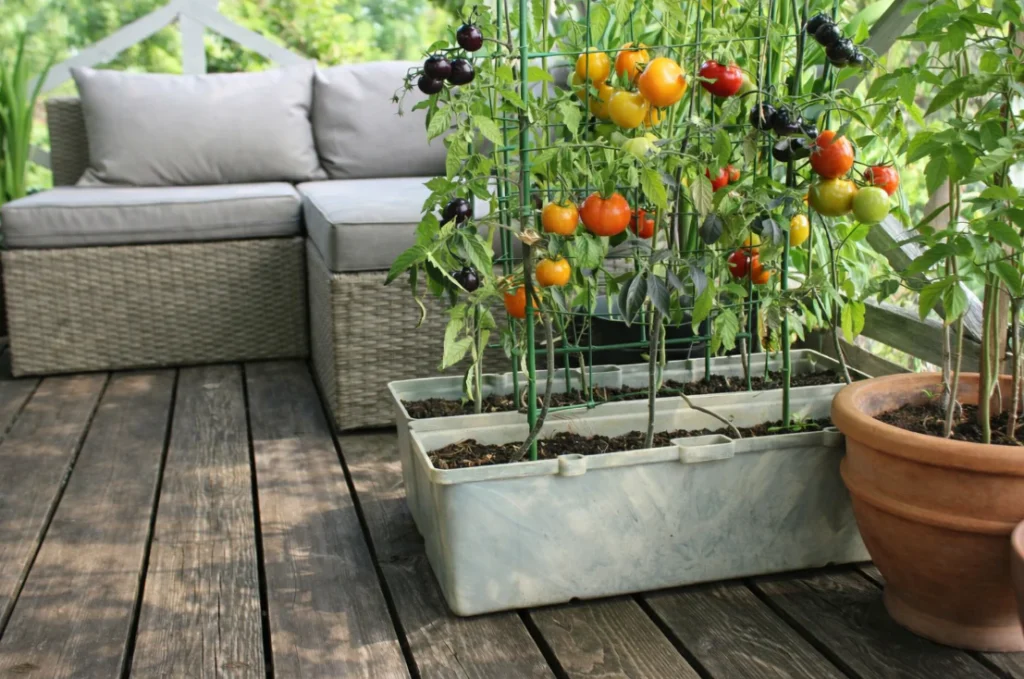
Q: Can I use a trellis for potted tomatoes?
A: Absolutely. For pots, the best options are a single stake (driven deep into the pot) or a cage that fits inside the rim. Place the pot against a wall or railing for extra stability against wind.
Q: How tall should a tomato trellis be?
A: For indeterminate (vining) varieties, aim for 6 to 8 feet. For determinate (bush) varieties, 3 to 4 feet is sufficient.
Q: What is the cheapest way to trellis tomatoes?
A: The Single Stake method using a free stick or branch, or the Florida Weave if you have multiple plants (since twine is very cheap).
Q: Can I reuse my tomato trellis next year?
A: Yes! Metal T-posts, cattle panels, and concrete mesh cages can last decades. Wooden stakes may last 3-5 years. Always disinfect your trellis materials with a weak bleach solution at the start of the season to kill any lingering fungal spores.