Geranium Winter Care: 3 Simple Ways to Save Them
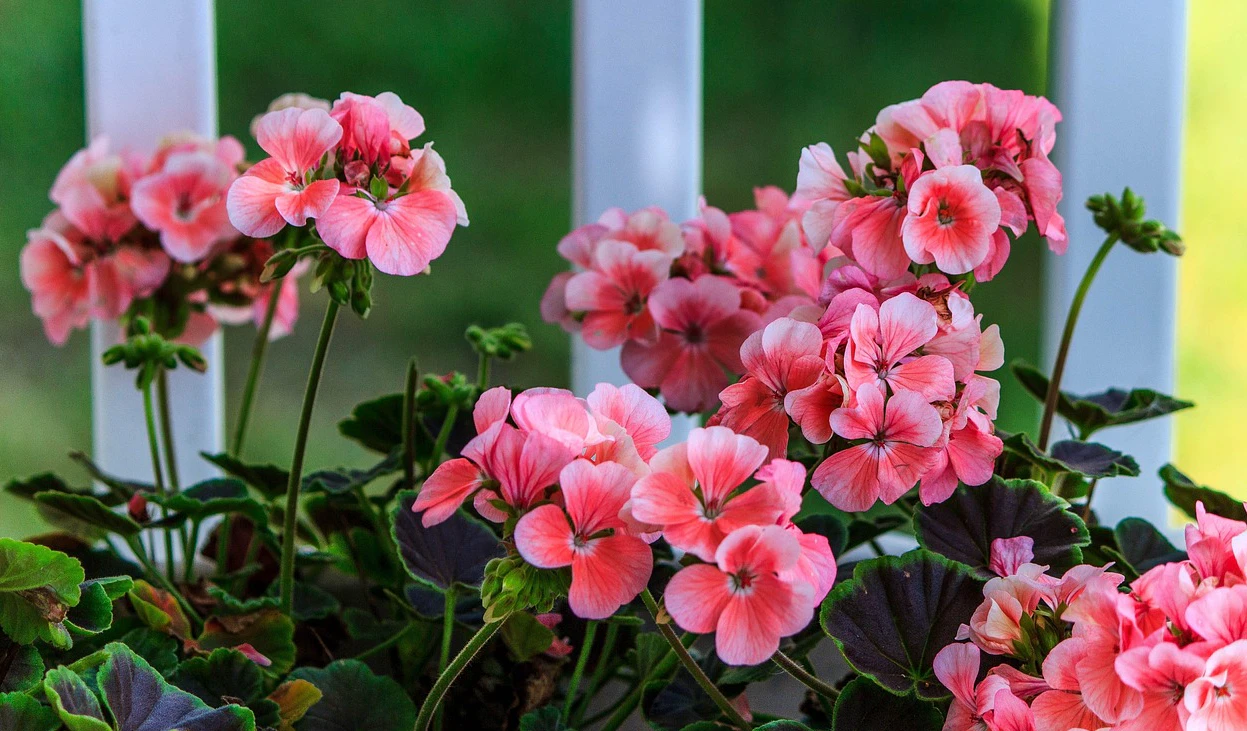
There’s just a wee bit of wistfulness in the air, don’t you think? The fall cleanup is wrapping up, there are the first whispers of frost in the evening weather forecast, and you’re standing there looking at those lovely pots of geraniums or Pelargoniums, should we get fancy! that created so much vibrant color all summer long. They still look pretty good, even breaking out in a few last-ditch defiant blooms. But you know their time is running out.
The tag probably read “annual,” and your instinct would be to just tip the pot onto the compost heap and call it a season. I did that too. It felt wasteful, almost blasphemous, after all the enjoyment they’d given me. It felt like such waste just to toss these beautiful, healthy plants.
Next, I called my friend Maria. Her grandmother, who wintered over gardens much colder than mine, never planted geraniums as if they were annuals, apparently. Maria showed that these hardy, sunny flowers don’t have to be a one-year wonder. With some effort surprisingly little, it turns out you can save your prized geraniums and bring them back for an even bigger, bushier show next year.
It was like discovering a gardening secret strength! In this article, I am going to explain the three simple steps Maria taught me for “overwintering” geraniums. Goodbye to tossing them out; let us save those beauties and have them years ahead.
- Is Saving Geraniums Worth the Trouble
- Setting Them Up for Success: Preparing Your Geraniums for Their Winter Rest
- Option 1: The Sunny Windowsill Survivor
- Option 2: Sleeping Beauty – The Dormant Bare-Root Method
- Alternative 3: Beginning Anew – Propagating Free Plants by Taking Cuttings
- Conclusion: More Than Just Saving a Plant
Is Saving Geraniums Worth the Trouble
As we progress to the “how,” maybe you’re thinking, “Is it worth all the hassle?” For me, the answer is a resounding YES. Here’s why i s convert:
You Get to Keep Your Absolute Favorites: Have you ever had that one geranium with the perfect color of pink, or the most gorgeous variegated leaves, that you just could not find again at the nursery the next year? Overwintering lets you keep such special varieties going year-round. It’s like keeping a living memory.
You Get Larger, Better Plants Next Spring: Geraniums preserved over the winter start next spring with a well-established root system. That makes them flower sooner, grow larger and fuller, and bloom earlier than small, fresh plants you buy in the spring. You’re ahead on beauty!
It’s Deeply Satisfying and Sustainable: In a world where we can be too quick to dispose, the joy of waking a plant from its winter sleep and bringing it back to life is genuine. It’s cost-saving, wastefulness-reducing, and more deeply connects you to your garden cycles.
Setting Them Up for Success: Preparing Your Geraniums for Their Winter Rest
Okay, you’re sold? Good! Now, prior to bringing them in or bedding them out, a little prep is all it takes.
Timing is Everything: Listen for Winter’s Knock
It is best to start the overwintering process right before your first hard frost prediction. You need the plants to have seen some fall chill, and that gets them to ready themselves to wind down, but you certainly don’t want to cover them up before a killing freeze turns them into mush. Keep an eye on your local weather prediction in late autumn.
A Trim and a Flying Health Check
Think of this as getting your plants ready for a long spa holiday.
Neaten Them Up: To start with, run your hand over each plant and remove dead, yellow, or rotten leaves and wilted flower stalks. Wash the leaves briefly in water if they’re full of dust or debris.
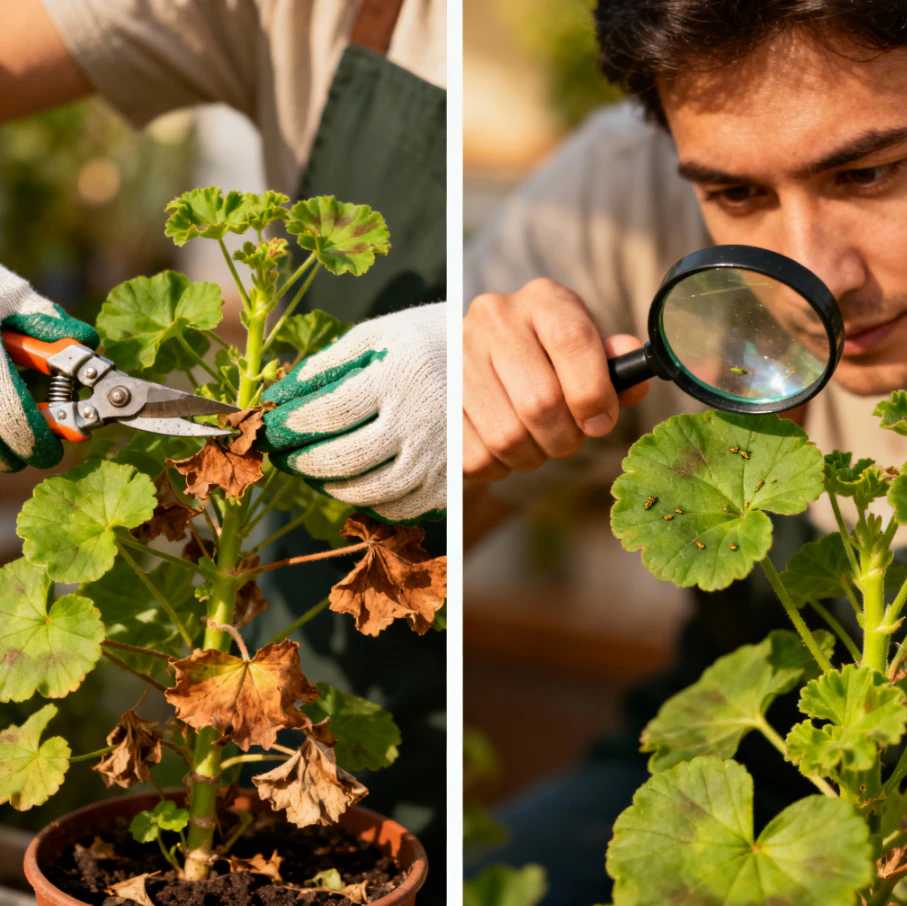
Look for Unwelcome Guests: This is crucial! Gently examine your plants, especially underneath leaves and at the joints of the stems, for any sign of insects like aphids, whiteflies, or spider mites. You DO NOT want to bring an infestation into the house. If there is any pest, I spray the plant thoroughly with insecticidal soap before bringing it in. Trust me, indoor pest control is a nightmare you won’t need – a mistake I cover in my book on avoiding beginner gardening gaffes.
Give Them a Prune: Go ahead and prune the whole plant in half, or even two-thirds. It is radical, I swear! But it puts the plant into dormancy, makes it compact and simple to store, and prevents weak, spindly growth throughout the winter.
Your geraniums are now ready for their winter journey. Let’s look at Maria’s three simple choices she was good enough to share with me.
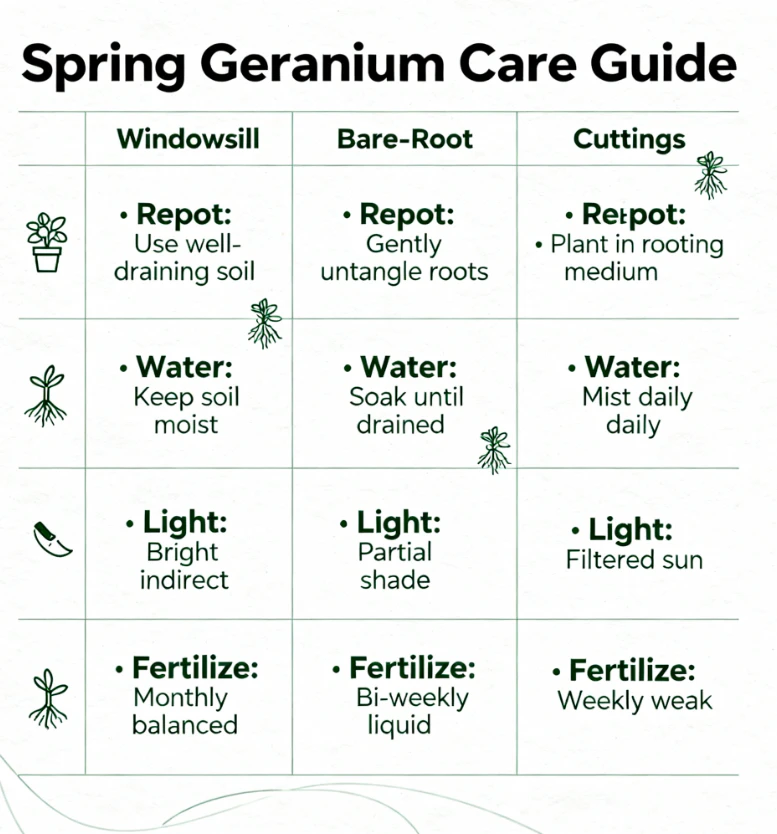
Option 1: The Sunny Windowsill Survivor
This method involves having your geraniums growing actively (but slowly) as indoor houseplants all through the winter.
Is This Method Suitable for You?
This is a good choice if you have a sunny, cool windowsill (south-facing, if possible) and enjoy having some living greenery in the winter. It requires the most “active” care of the three choices, but it’s pleasant to have those familiar leaves present all winter.
Bringing Them Indoors The Process
If your geraniums are already in pots, this is no issue. Just bring the prepared (cleaned, inspected, pruned) pots in. If they were planted in the ground or an enormous pot that you can’t move, you’ll need to dig them up carefully, as much of the root ball as you can, and pot them up into smaller, individual pots with fresh potting mix. Never use garden soil in pots – something container gardening must learn.
Winter Windowsill Secret Cool & Bright
This is Maria’s secret from her grandmother. Geraniums don’t care to be in a warm dry living room over a heating vent. They prefer cool winter conditions.
Light
Place them in the brightest possible light. A south window is ideal. Without enough light, they become weak and leggy.
I certainly have. I’ll never forget the first stunning rose bush I lost to a harsh winter simply because I didn’t know how to protect it.
How to Prepare Your Roses for Winter: A Beginner’s Step-by-Step Guide.
Temperature
Attempt to make room temperatures cold, ideally 50-60°F (10-15°C). A cooled sunroom, an unheated porch which stays above freezing, or even just a cooler space near a window away from radiators is acceptable.
Watering: It’s crucial
Treat them as succulents in winter. Water sparingly, only when the soil is completely dry an inch or so below. Overwatering in cold, low light will kill them quickest. They might only need to be watered every few weeks.
Expectations:
Don’t expect a bed of flowers. Survival, not a summer flower show, is the goal here. You might get a few flowers, but the plant is usually just being sustained until spring.
Option 2: Sleeping Beauty – The Dormant Bare-Root Method
This method appears totally insane, appears even more bizarre, but functions quite nicely and occupies the smallest space and energy all winter long. You essentially bully the plant into complete sleep.
Is This Method Right for You?
This is the best option if you don’t have sunny windowsills or much indoor space, but you do have a cool dark dampish place to place them (like a basement, crawl space, or unheated garage that never goes below freezing).
The Apparently Brutal Process
I’ll admit, the first time Maria told me to do this, I was horrified. It just felt wrong.
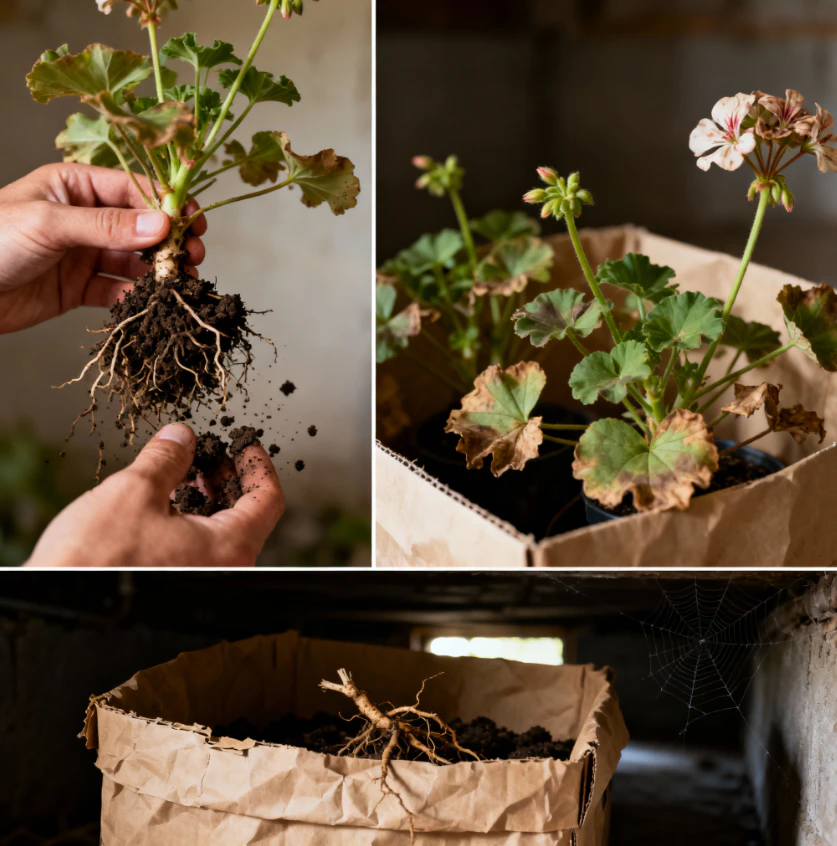
Uproot and Clean: Carefully dig up your geranium plants. Gently shake or brush all the soil from the roots. You want them “bare-root.”
Box ‘Em Up (or Hang ‘Em High): Maria’s granny used to hang them upside down from the rafters in her cool cellar. I don’t have rafters, so I do what Maria does these days: place the bare-root plants separately into paper bags or roughly in a cardboard box. Some people even add a handful of damp peat moss to the box with them.
12 Beautiful Plants That Add Stunning Color to Your Fall and Winter Garden
The Cool, Dark Sleep: Store the bag or box in a cool (45-50°F / 7-10°C), dark, and slightly damp place. A basement corner or an empty closet usually will suffice.
The Occasional Check-up: What you’d like them to stay is dormant but never completely desiccate. Check in on them monthly. If stems look completely shriveled, you may give the roots a very light spritzing of water, but not wet them, or they’ll rot.
The Spring Awakening Miracle
Seriously, the initial time I did this, I was convinced that I was simply storing away a box of dead sticks for winter. They look completely lifeless. But springtime (about 6-8 weeks before the last frost), magic happens. You gather up these “dead sticks,” clip off really brittle or soft spots, pot them up into fresh potting soil, give them plenty of water, set them in a sunny place, and wait. Within a week or two, you’ll find yourself discovering little green sprouts popping out. It’s a miracle!
Alternative 3: Beginning Anew – Propagating Free Plants by Taking Cuttings

This is my tried-and-tested method now. Instead of keeping the large, old plant, you cuttings take in autumn to create new fresh young plants that are less problematic to care for indoors over winter.
Is This Method Right for You?
This is the ideal choice if you don’t want the hassle of keeping large dormant plants, or if you want to run a choice variety, or if you simply want loads of healthy young plants ready for spring. It takes up the least amount of storage space.
Building Your New Geranium Clan
Take Healthy Cuttings: During early fall, before it gets too chilly, take a few cuttings that are 4-5 inches from the healthy, not-flowering tips of your choice geraniums. Make the cut just below a leaf node (where a leaf meets the stem).
Prep the Cutting: Remove the lower leaves from each cutting, leaving 2-3 leaves at the top. This minimizes moisture loss.
Rooting Time: You have two simple options:
In Water: Place the cuttings in a jar of water on a bright windowsill. Change the water every few days. Roots should form within a few weeks.
In Soil (My Choice): Dip the cut end in rooting hormone (optional but helpful) and place it in a small pot with damp seed-starting mix or perlite/vermiculite mix. Gently cover the pot with a plastic bag to create a mini-greenhouse effect. Leave it in bright, indirect light. (It’s a valuable skill for any gardener to learn how to propagate houseplants in water or soil!)
Winter Care for Your Babies: Once the cuttings have rooted well (either in water or soil), pot them up individually in small (3-4 inch) pots using normal potting compost. Treat these young plants just as you would using Method 1 (The Sunny Windowsill Survivor): give bright cool light and water sparingly.
The Spring Advantage
You won’t have a large, perhaps woody mature plant to revive by springtime. Instead, you’ll have several little, lively, well-established young plants that will explode into growth as soon as you plant them outdoors. And you may have some spares to share with your friends!
Waking Them Up: How to Bring Your Geraniums Back for Spring
Regardless of your technique, the process of reviving your geraniums in spring is pretty much the same and normally starts around 4-6 weeks before your last frost date.
For Windowsill Survivors: During longer, lighter days, you can see them growing more vigorously. Water a bit more often and give the first light feeding with a diluted liquid fertilizer. Repot them in bigger pots if they get too root-bound.
For Bare-Root Sleepers: Remove them from storage. Trim off any sections which are fully dehydrated or soft. Plant them up in new potting mix, water thoroughly, and put them in a light position. Have patience; it could take seven days to two weeks before new growth shows.
For Your New Cuttings: Acclimate these new plants slowly to outdoors (a process called “hardening off”) before planting them in their final pots or garden beds when the danger of frost is past.
Conclusion: More Than Just Saving a Plant
Saving geraniums during the winter is more than saving a favorite plant or saving money. It has become a ritual for me. It’s a gesture of tenderness, a lesson in patience, and a physical reminder of the garden’s cyclical nature.
That initial spring moment when you spot the first new green sprout pushing through on a plant you’d thought for sure was dead? It’s a small victory that’s Uber-gratifying. It’s a testament to the fact that no matter how long and cold the winter’s hibernation, life will return.
You don’t need to rescue every plant. But this year, why not attempt to rescue just one? Select one of these easy techniques, have a go, and observe the result. You could be surprised.