How to Plant Tulips So They Actually Bloom (And Squirrels Don’t Eat Them!)
I’ll never forget the first time I bought a big bag of tulip bulbs. It felt like I was hiding inside the bag. The pictures from last year’s front yard still flash before my eyes, promising a glorious, vibrant spring garden. I was so excited. I spent an afternoon planting them, and then… nothing. Nothing at all. Spring came, and maybe five or ten sad-looking flowers bloomed. The rest? They were a midwinter meal for every squirrel within a five-mile radius.
I was so frustrated. I thought, “That’s it, tulips are too fussy for me. I’m sticking to daffodils.”
But the truth is, tulips aren’t fussy; they just have a specific set of rules. They are the beautiful divas of the spring garden. They demand a little extra, but they reward you with a show-stopping performance that no other flower can match. I’ve learned from my own (many) mistakes and from my garden-obsessed friends how to actually make them work.
So, if you’re holding your own bag of bulbs right now, feeling both excited and a little terrified of messing it up, this guide is for you. I’ll walk you through the real process, step-by-step. Let’s get this right.
- What's the Big Deal About Tulips Anyway?
- The Most Important Secret: When to Plant Tulips
- Choosing Your Champions: Not All Tulips Are Created Equal
- My Step-by-Step Planting Guide for a Perfect Spring Show
- The Great Tulip Debate: Will They Come Back Next Year?
- How to Outsmart the Squirrels (My Arch-Nemesis)
- What to Do After They Bloom (Don't Cut the Leaves!)
- Conclusion: The Most Rewarding Act of Patience
What’s the Big Deal About Tulips Anyway?
Why do we even bother with these divas? Honestly, because nothing else has the same “wow” factor. Daffodils are cheerful, reliable friends. Crocuses are the brave first arrivals. But tulips? Tulips are the peacocks of the garden.

They bring the drama, the rich color, and the elegant, iconic shape that just screams “spring” louder than anything else.
They are a statement. A yard full of well-planted tulips stops traffic. My friend Maria has a small front border where she plants 200 ‘Apricot Impression’ tulips every year, and people literally stop their cars to look at it. That’s the power of the tulip. They just make you feel something.
The Most Important Secret: When to Plant Tulips
This is the number one question, and the answer is simple: You must plant tulip bulbs in the fall.
I get it, it feels weird. You’re cleaning up your garden, everything is dying back, and here you are planting things for next spring? Yes! This timing is the most critical part of their success.
Why the Fall? The Magic of the “Chilling Period”

Spring-blooming bulbs like tulips aren’t just sleeping underground all winter; they are developing. They require a long period of cold (at least 12-15 weeks) to trigger the biochemical process that tells the bulb to produce a strong stem and a beautiful flower. This is called “vernalization” or the “chilling period.”
Without this cold nap, the bulb simply won’t know it’s time to bloom. It might send up a few sad leaves and nothing else (a classic beginner gardening mistake I see all the time).
Finding the “Sweet Spot” for Planting
So, “fall” is a big window. When exactly do you plant?

The sweet spot is when your average nighttime temperatures consistently stay between 40-50°F (4-10°C).
- Don’t plant too early: If the soil is still warm, the bulbs might sprout too soon, sending up leaves that will just get zapped by the first hard frost.
- Don’t plant too late: My friend Russell once forgot his bulbs in the garage until December. By then, the ground was frozen solid. He tried (bless his heart), but it was hopeless. You need to get them in the ground before it freezes hard.
For most of the US and Europe, this means October or November is the perfect planting time.
Choosing Your Champions: Not All Tulips Are Created Equal
Walking into a garden center in the fall is overwhelming. You’ll see bags and bags of tulips with different names and fancy pictures. Here’s a simple breakdown of what to look for.
A Quick Guide to Buying Healthy Bulbs
This is the first lesson I learned. You can do everything else right, but if you start with a bad bulb, you’ll get a bad flower.

- Feel the Bulb: This is my main test. A healthy bulb should feel firm and heavy for its size, like a small, solid onion.
- Avoid Spongy or Soft Bulbs: If you can press your thumb into it and it feels squishy or soft, put it back. That’s a sign of rot.
- Check the Skin: Look for bulbs with their papery “tunic” or skin mostly intact. A little flaking is fine, but a completely naked, dried-out bulb might be damaged.
- Size Matters: In the tulip world, bigger bulbs generally equal bigger, stronger flowers. Don’t just buy the cheapest bag; look for the one with the plumpest bulbs.
The Main Types of Tulips (Simplified)
You don’t need to be an expert, but knowing the main categories helps you plan your bloom time.

- Early-Spring Bloomers (Kaufmanniana, Fosteriana): These are usually shorter, tougher tulips that bloom right after the crocuses. They’re great for rock gardens or the front of a border.
- Mid-Spring Bloomers (Triumph, Darwin Hybrid): This is the category I recommend most for beginners. They are the classic, cup-shaped tulips, come in every color, have strong stems, and are very reliable. My favorite “Darwin Hybrids” (like ‘Apricot Impression’) are also the most likely to return the following year.
- Late-Spring Bloomers (Parrot, Lily-Flowered, Peony-Flowered): These are the fancy, dramatic divas. Parrot tulips have ruffled, feathered petals. Peony-flowered tulips are massive and look just like their namesake. They are absolutely stunning but sometimes have weaker stems, so I plant them in a spot protected from strong winds.
I’ve learned that fall isn’t just about endings; it’s also a secret season of beginnings. Plant Now for Spring Beauty: A Beginner’s Guide to Fall-Planted Bulbs
My Step-by-Step Planting Guide for a Perfect Spring Show
Alright, you’ve got your bulbs, you’ve got your spot. Let’s plant. This is my foolproof method, learned from that first squirrel-feeding disaster.
Step 1: Find the Perfect Home (Sun and Soil)
Tulips need two things to be truly happy:

- Full Sun: Find a spot that will get at least 6 hours of direct sunlight in the spring. Remember, the spot under your big leafy tree might be shady in summer, but it’s probably perfectly sunny in March and April before the leaves come out!
- Well-Drained Soil: This is the most critical factor. Tulips hate having “wet feet.” If you plant them in a low-lying spot where water puddles, or in heavy, dense clay soil, they will rot before they ever get a chance to grow. If you have heavy clay, this is where you’ll want to seriously improve your garden soil with compost.
Step 2: Dig the Hole (Go Deeper Than You Think!)
This was my single biggest mistake my first year. I planted my bulbs only 3-4 inches deep, which is basically ringing the dinner bell for squirrels.

- The Golden Rule: Plant tulip bulbs 6 to 8 inches deep. A good rule of thumb for all bulbs is to plant them 3 times as deep as the bulb is tall. Since most tulip bulbs are 2-3 inches tall, that means digging deep.
- Why So Deep? Deeper planting helps in two ways. First, it makes it much harder for squirrels and other critters to smell and dig them up. Second, it anchors the tall flower stem, so it doesn’t flop over on the first windy day.
Step 3: Plant Them “Pointy Side Up”
This is the part that panics every beginner. Look at your bulb. You’ll see one end is flat (where the roots come out) and one end is pointed (where the stem comes out). You want to plant them pointy side up.
What happens if you plant it upside down or sideways? Honestly… it will probably still bloom. Plants are amazing survivors. The stem will figure out which way is up, but it will waste a ton of energy making that U-turn underground, resulting in a weaker plant. So, take a second to get it right.
Step 4: The “Layer Cake” Method (My Favorite Design Tip)
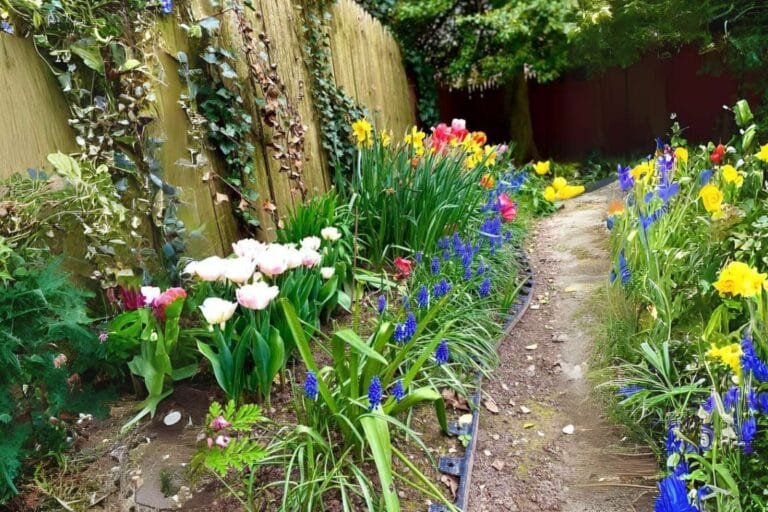
You can plant your tulips in neat, orderly soldier rows. But IMO, they look 100 times better when they are in abundant, natural-looking clusters.

- Plant in Groups: I dig a wide, shallow hole (still 6-8 inches deep) and plant a group of 5, 7, or 9 bulbs in a random-looking cluster, spacing them a few inches apart. It looks so much more professional and natural.
- The Lasagna Pot: This is my favorite trick for container gardening. Get a big, deep pot. Plant your latest-blooming, deepest bulbs (like tulips) first. Add a layer of soil. Plant your mid-season bulbs (like daffodils). Add more soil. Plant your earliest, shallowest bulbs (like crocuses) on top. In the spring, you get a continuous, multi-layered flower show from one single pot!
Step 5: Cover, Water, and Mulch
Once your bulbs are in their holes, cover them back up with the soil. Gently firm the soil down with your hands.

- Water Them In (Just Once): Give the area a good, deep watering right after you plant. This settles the soil around the bulbs and signals them to start growing roots before the ground freezes. You do not need to water them again all winter.
- Add Mulch: After you water, cover the entire bed with a 2-3 inch layer of mulch, like shredded leaves or straw. This insulating blanket is a key part of your fall garden cleanup, as it protects the bulbs from extreme temperature swings and hides their location from curious squirrels.
The Great Tulip Debate: Will They Come Back Next Year?
This is the hard truth no one wants to tell you. Most modern tulips are best treated as glorious annuals.
You plant them in the fall, they put on a spectacular show in the spring, and that’s it. While some might come back, the display will usually be weaker and less impressive the following year. They have been hybridized for their flower, not for their long-term stamina.

- Which ones are most likely to return? Darwin Hybrids are your best bet. If you give them perfect conditions (full sun, dry soil in the summer, and let the leaves die back fully), you might get a good show for 2-3 years.
- Which ones almost never return? The super-fancy Parrot, Peony-flowered, and French tulips are almost always a one-and-done show.
- My Personal (Honest) Method: I treat them all as annuals. I plant big, fresh, glorious new bulbs every single fall in my main beds. This guarantees a breathtaking, magazine-worthy display every spring. I pull out the old bulbs after they bloom to make room for my summer flowers. It’s a small investment for such a massive reward.
How to Outsmart the Squirrels (My Arch-Nemesis)
Okay, let’s talk about the enemy. You plant 50 bulbs. You get 5 flowers. The squirrels dug up the other 45. I’ve been in this situation, and I’ve declared war. Here are some strategies that actually work.

- The rainbow of colors in this mixture will add the perfect touch to your garden this spring! 18″-20″ Tall Blooms mid spr…
- Plant Deep: As mentioned in Step 2, planting 8 inches deep is your best first defense. Most squirrels are lazy and won’t bother digging that far down when there’s easier food elsewhere.
- The Chicken Wire Shield (My 1 Weapon): This is my foolproof method. After I plant my bulbs, I lay a sheet of chicken wire flat on top of the soil and secure it with a few stakes. Then I cover the wire with my 2-3 inches of mulch. The bulbs can easily grow through the holes in the wire, but the squirrels cannot dig down through it. It works every time.
- The “Pepper Spray” Trick: My friend Maria swears by this. She dusts the bulbs with cayenne pepper before planting them and sprinkles more on top of the soil. The squirrels hate the spicy smell and taste. You just have to reapply it after a heavy rain.
- Disguise the Area: After you plant, don’t leave piles of dug-up soil or the papery bulb skins lying around. That’s like leaving a giant “DINNER HERE” sign for them. Clean up the area and cover it with mulch immediately.
What to Do After They Bloom (Don’t Cut the Leaves!)
Let’s fast-forward to spring. Your tulips were beautiful, but now the flowers are faded. Your instinct is to tidy up and cut all that ugly foliage down. Don’t do it!
This is the other big mistake beginners make.

- Step 1: Deadhead the Spent Flower: As soon as the flower petals drop, cut off the flower head itself. This stops the plant from wasting energy trying to make seeds.
- Step 2: Let the Leaves Die Back Naturally: This is the hard part, as it looks messy. You must leave the foliage in place for about 6 weeks, or until it turns completely yellow and brown. Those leaves are acting as solar panels, soaking up the sun’s energy and recharging the bulb for next year’s (potential) bloom.
- My Tip for Hiding Them: I plant my tulips behind or among my emerging summer perennials. As the perennials (like Hostas or Daylilies) grow, they conveniently hide the ugly, dying tulip foliage.
Conclusion: The Most Rewarding Act of Patience
Planting tulip bulbs in the fall is the ultimate act of delayed gratification. It’s a quiet, hopeful task you do in the cold, trusting that you’ve done it right. You tuck them in, walk away for five months, and almost forget about them.

And then, one day in March or April, you’ll see those first green spears pushing up through the soil, and the anticipation is just incredible. When they finally burst open into a riot of color, it feels like a personal victory. You didn’t just plant a flower; you planted a promise, and it kept it.
Trust me, it’s worth every second of the wait.