11 Simple Vegetables Anyone Can Grow at Home
Hello fellow garden enthusiasts (and future enthusiasts)! My name is Juwel, and my backyard is my little slice of paradise. I wasn’t born with a “green thumb” far from it. I remember a time when I thought gardening was some complicated science reserved for experts with huge plots of land and expensive tools. I looked at my small, empty yard and felt completely lost, convinced I’d kill anything I tried to plant.
But let me tell you a little secret: if I can do it, you absolutely can too.
Starting a garden doesn’t have to be overwhelming. The biggest mistake new gardeners make isn’t killing a few plants (we all do that!), but choosing the wrong, overly complicated vegetables to begin with. The right plants can make all the difference between a frustrating chore and a joyful, life-changing hobby. And the best part? You don’t need a massive yard. I started with just a few pots on a tiny balcony, and many of these vegetables are still thriving in containers in my garden today.
So, grab a cup of tea, and let me walk you through the 11 simple vegetables that I believe anyone can grow at home. These are my tried-and-true favorites the ones that have rewarded me year after year, even when I was a complete beginner.
- 1. Lettuce: Your First Taste of Gardening Success
- 2. Spinach: The Nutrient-Packed Powerhouse
- 3. Radishes: The Impatient Gardener’s Best Friend
- 4. Carrots: Digging for Buried Treasure
- 5. Cucumbers: The Gift That Keeps on Giving
- 7. Tomatoes: The Star of the Summer Garden
- 8. Zucchini: The Astonishingly Generous Giver
- 10. Onions: The Low-Maintenance Kitchen Staple
- My Final Thoughts for You
1. Lettuce: Your First Taste of Gardening Success

If I could only recommend one vegetable for a first-time gardener, it would be lettuce. It was the very first thing I ever grew that didn’t immediately die on me, and that feeling was electric! Why do I love it for beginners? Because it grows incredibly fast, and there’s nothing quite like the confidence boost you get from snipping your own fresh, crisp leaves for a salad in just a few weeks. Store-bought lettuce simply cannot compare to the taste of leaves harvested just moments before you eat them.
Why It’s Perfect for Beginners:
Lettuce is forgiving. It doesn’t need perfect soil, it grows well in cooler temperatures, and you get to harvest from it over and over again. But you also need to know how to take care of your garden in winter. This continuous reward is what keeps you motivated.
My Favorite Varieties for Beginners:
Forget trying to grow a perfect, tight head of iceberg lettuce. Start with loose-leaf varieties. They are far more forgiving. Look for names like ‘Black Seed Simpson’, ‘Oakleaf’, or a colorful ‘Salad Bowl Red’.
Growing Guide:
- Best time to plant: Lettuce loves cool weather. I plant my first batch in early spring and then a second batch in late summer for an amazing autumn harvest.
- Sunlight needs: This is my biggest secret for sweet, tender lettuce: they hate “hot feet.” They thrive with 4-6 hours of morning sun but truly appreciate some shade during the scorching afternoon heat. Too much heat makes the leaves bitter.
- Soil and Containers: They are not picky, but they do love rich, well-draining soil. They are perfect for containers, window boxes, or raised beds. A pot that’s at least 6-8 inches deep is ideal.
- Watering: Keep the soil consistently moist, like a well-wrung-out sponge. If the soil dries out completely, the lettuce will get stressed and taste bitter.
- Common Problems: The most common issue is “bolting,” where the plant sends up a flower stalk due to heat. Once this happens, the leaves are no longer tasty. The solution is to harvest regularly and provide that afternoon shade.
Harvesting Like a Pro: This is the best part! Don’t pull the whole plant up. Practice the “cut-and-come-again” method. Take a pair of scissors and snip the outer, larger leaves, leaving the smaller, inner leaves to continue growing. By doing this, a single plant can provide you with fresh salad greens for a month or more.
2. Spinach: The Nutrient-Packed Powerhouse

If you want to grow something that’s both ridiculously easy and a nutritional superstar, spinach is your answer. It’s another cool-weather lover that grows with surprising speed. I absolutely love tossing a handful of fresh spinach from my garden into my morning omelet or smoothie. The taste of the earthy smell of the things you pick up with your own hands, which you won’t find in the bagged products you find in stores – it’s truly unimaginable.
Why It’s Perfect for Beginners: Spinach is incredibly resilient and doesn’t demand much attention. It sprouts quickly, and you can get multiple harvests from a single planting, making it a very rewarding crop for the amount of space it takes up.
My Favorite Varieties: For beginners, I recommend ‘Bloomsdale Long Standing’ because it’s slow to bolt. ‘Tyee’ is another excellent, disease-resistant variety.
Step-by-Step Growing Guide:
- Best time to plant: Like lettuce, spinach despises summer heat. I’ve learned the hard way that a fall planting is often the most successful and trouble-free. Now that winter is coming, what vegetables will you grow in winter? I am talking about that. Plant seeds in late summer or early fall for a harvest that can last into the winter in many climates.
- Sunlight needs: It’s happy with full sun in the cool months of spring and fall, but it will also tolerate partial shade.
- Soil and Containers: It grows beautifully in containers that are at least 8 inches deep. Make sure the soil is rich in organic matter like compost.
- Watering: Spinach leaves are mostly water, so they need consistent moisture to be tender. Don’t let the soil dry out, but avoid making it soggy.
- Common Problems: Slugs and snails love tender spinach leaves. A simple trick I use is to place a shallow dish of beer near the plants; they are attracted to it and it solves the problem overnight.
Harvest Hacks: You can use the same “cut-and-come-again” method as with lettuce, harvesting the outer leaves. Or, you can wait until the leaves are a decent size and harvest the entire plant at once. For the best flavor, harvest in the morning when the leaves are crisp and full of moisture.
3. Radishes: The Impatient Gardener’s Best Friend
Seriously, if you want to feel like a gardening genius in under a month, grow radishes. They are unbelievably fast, going from seed to salad in just 3-4 weeks. I often use them as “row markers” when I plant slower-growing crops like carrots. The radishes are up, harvested, and eaten long before the carrots need the extra space. It’s a brilliant way to get two crops from one patch of soil.
Why It’s Perfect for Beginners: Their speed! This quick turnaround is incredibly motivating and perfect for gardening with kids. They require very little space and are not fussy about soil.
My Favorite Varieties: Classic small, round varieties like ‘Cherry Belle’ or ‘French Breakfast’ are fantastic for beginners. They are crisp, mild, and mature quickly.

Growing Guide:
- Best time to plant: Radishes are another cool-weather crop. Plant them in early spring and again in the fall.
- Sunlight needs: They need at least 6 hours of sun to develop their roots properly.
- Soil and Containers: They need loose, well-drained soil so the roots can grow without obstruction. A container that is 6-8 inches deep is plenty.
- Watering: Water them regularly. Inconsistent watering is the primary cause of radishes becoming “woody” or cracking.
- Crucial Tip – Don’t Crowd Them! This is the biggest mistake I made at first. It’s tempting to sprinkle a lot of seeds, but if they are too crowded, they will focus all their energy on growing leaves and you’ll get no root. After the seedlings are an inch tall, you must thin them out to about 2 inches apart. This one simple step is the secret to getting perfect, round radishes.
Pro Picker: Start checking on them after about 3 weeks. The best way to know if they’re ready is to gently brush away the soil at the base of the leaves. If you can see the top of the root and it looks about an inch across, it’s ready to pull. Don’t wait too long, as they can become spicy and tough.
4. Carrots: Digging for Buried Treasure
My kids absolutely love pulling carrots out of the ground. It’s their favorite garden activity, and honestly, mine too! It truly feels like digging for buried orange treasure. The taste of a homegrown carrot, freshly pulled from the soil and rinsed under a tap, is so intensely sweet and crisp, it will ruin grocery store carrots for you forever.

What Makes Them a Great Starter Crop? Once they get going, carrots are surprisingly low-maintenance. They don’t demand much fuss, and the excitement of the harvest is a huge payoff that gets everyone, especially kids, excited about gardening.
Varieties I’ve Had Success With: For pots or less-than-perfect soil, I recommend shorter, rounder varieties like ‘Paris Market’ or ‘Danvers Half Long’. If you have a raised bed with deep, loose soil, then a classic long variety like ‘Scarlet Nantes’ is fantastic.
My Method for Sweet, Straight Carrots:
- The Soil is Everything: This is the most important secret for carrots. They absolutely need deep, loose, and rock-free soil to grow long and straight. If your soil is heavy clay or full of stones, you’ll end up with sad, forked little carrots. This is precisely why I started growing mine in raised beds it gives me total control over the soil quality.
- A Lesson in Patience: Carrot seeds can test your patience. They sometimes take up to three weeks to sprout! The trick I learned is to keep the soil surface consistently moist during this whole time. After seeding, I often lay an old wooden plank over the row. This simple trick keeps the soil from drying out and crusting over. I just make sure to peek under it every day, and as soon as I see the first green sprouts, I remove the plank.
- Give Them Room to Grow: Just like radishes, carrots need their personal space. Once the green tops are a couple of inches tall, you need to “thin” them by gently plucking out the weaker seedlings, so the remaining ones are about 2-3 inches apart. It feels brutal, I know, but trust me, this step is essential for getting good-sized carrots.
Knowing When to Harvest: You can start checking on them about 2 months after planting. The best way is to gently brush away the soil from the “shoulder” of one of the carrots. If the top looks about an inch across, they are ready to be pulled. A little frost actually makes them taste even sweeter!
5. Cucumbers: The Gift That Keeps on Giving
I think of cucumbers as the cheerleaders of the summer garden. They grow incredibly fast and are so productive! I love hearing the satisfying “snap” when I pick a fresh one off the vine. Making a salad with a cucumber I picked just five minutes earlier is one of summer’s greatest simple pleasures.
Why They’re a Rewarding Choice: Once they start producing, they don’t stop! Their vigorous growth and high yield are incredibly motivating for new gardeners. Plus, they can be trained to climb, which is a fantastic space-saver.
Bush vs. Vine: What’s the Difference? For beginners, this is an important choice. ‘Bush’ varieties (like ‘Bush Pickle’) are compact and perfect for large pots. ‘Vining’ varieties (like ‘Marketmore 76’) will climb, and you’ll need to provide a trellis or cage for support. I personally love vining types because growing them vertically saves so much ground space.

My Keys to a Great Cucumber Harvest:
- They are Thirsty Plants: The name says it all cucumbers are full of water. This means they need consistent and deep watering, especially once they start flowering and producing fruit. An inch or two of water per week is a good rule of thumb. I learned that letting them dry out can make the cucumbers taste bitter.
- Feed Them Well: They are heavy feeders. I always mix a generous amount of compost into the soil before planting and then give them a drink of compost tea every few weeks once they start fruiting.
- A Little Support Goes a Long Way: For vining cucumbers, a trellis is a must. Growing them vertically not only saves space but also improves air circulation which prevents diseases and makes the cucumbers grow straighter and easier to find.
The Secret to More Cucumbers: Harvest, harvest, harvest! The more you pick, the more the plant will produce. Don’t let the cucumbers get too big and yellow on the vine. Harvest them when they are firm and a good green color for the best taste and to signal the plant to keep making more.
6. Green Beans: The Easiest Vegetable on the Planet?
I’m only half-joking with that title. Green beans are so reliable and easy to grow that they almost feel like cheating. They seem to thrive on a bit of neglect, and the yields can be massive. They are the perfect crop to plant if you want to feel like a gardening hero with minimal effort.
What Makes Them So Simple? They are not picky about soil and, as a legume, they actually fix nitrogen in the soil, which benefits other plants. They also grow quickly and are relatively pest-free.

Pole Beans vs. Bush Beans: This is your main choice. ‘Bush beans’ (like ‘Bush Blue Lake’) grow into a compact, low-growing bush and produce their crop all at once over a couple of weeks. They are great for small spaces and pots. ‘Pole beans’ like ‘Kentucky Wonder’ are climbers that need a tall trellis or pole. They produce a smaller amount at a time but will keep producing for a much longer season. I grow a bit of both!
My Tried-and-True Method:
- Direct Sow, Don’t Transplant: Beans do not like having their roots disturbed. I always plant the seeds directly in the garden where they are going to grow, about an inch deep, after all danger of frost has passed.
- Don’t Overwater Early On: This was a mistake I made. I was so eager that I overwatered the seeds, and some of them rotted before they could sprout. Water the soil when you plant, and then wait until you see the sprouts before watering again.
- Mulch is Their Friend: Once the plants are a few inches tall, a layer of straw or grass clipping mulch around their base helps keep the soil moist and the weeds down.
The Joy of the Harvest: Start checking for beans about 50-60 days after planting. Pick them when they are young and tender, before the seeds inside start to bulge. The best way to know is to snap one in half if it makes a clean “snap,” it’s ready. And just like cucumbers, the more you pick, the more the plant will produce.
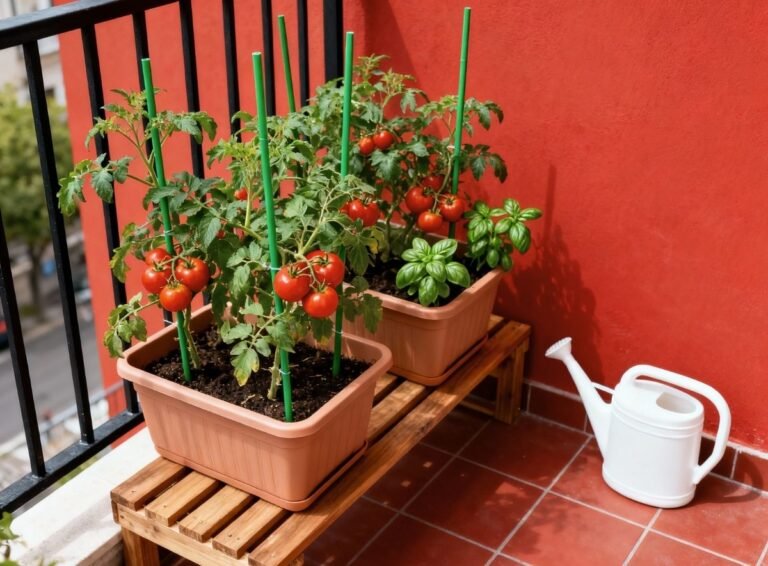
7. Tomatoes: The Star of the Summer Garden
Let’s be honest, this is the plant everyone dreams of growing. There is absolutely, positively nothing in the world that tastes as good as a sun-warmed tomato picked straight from your own garden. The flavor is an explosion of summer. They might seem intimidating, but if you follow a few simple rules, you can have an amazing harvest.

The Best Starting Point for Beginners: My advice? Don’t start from seed your first year. Buy a healthy-looking starter plant from a local nursery. It’s so much easier. Also, choose a ‘determinate’ or ‘patio’ variety (like ‘Celebrity’ or ‘Patio Princess’). These grow to a manageable, bush-like size and are perfect for containers. ‘Indeterminate’ varieties can grow into massive vines that need a lot of pruning and support.
My Golden Rules for Great Tomatoes:
- Sun, Sun, and More Sun: Tomatoes are sun-worshippers. They need an absolute minimum of 6-8 hours of direct, unfiltered sunlight per day. This is non-negotiable.
- Deep Planting: Here’s a pro tip: when you plant your tomato seedling, pinch off the lowest set of leaves and plant it deep, burying the stem up to the next set of leaves. The tiny hairs on the stem will turn into extra roots, creating a much stronger plant.
- Consistent Watering is Crucial: Water them deeply and at the base of the plant, not on the leaves which can encourage disease. Inconsistent watering letting the soil dry out completely and then flooding it is the main cause of “blossom-end rot” and cracked fruit.
- Support is Essential: Don’t wait until the plant is falling over. Put your stake or cage in place right when you plant it to avoid damaging the roots later.
Harvesting Your Red Jewels: For the absolute best flavor, let the tomatoes ripen fully on the vine until they are deep in color and slightly soft to the touch. Pick them in the afternoon on a warm day, as that’s when their sugars are most concentrated.
8. Zucchini: The Astonishingly Generous Giver
A word of warning about zucchini: be careful what you wish for! These plants are so ridiculously productive that you’ll be giving zucchini away to your friends, family, and neighbors. Just one or two plants are usually more than enough for a whole family. They grow fast, and the transformation from flower to fruit seems to happen overnight.

Why It’s a Beginner’s Favorite: It’s almost impossible to fail with zucchini. They grow large, leafy, and produce an abundance of fruit with very little effort.
My Advice for a Happy Zucchini Plant:
- Give It Space: Zucchini plants grow into large, sprawling bushes. Give them at least 3 feet of space all around. They are great for filling in a large, empty spot in the garden.
- Rich Soil and Sunshine: They are heavy feeders and love the sun. I always work a generous amount of compost into the soil before planting.
- Watch for Powdery Mildew: In humid weather, the large leaves can sometimes get a white, powdery fungus. The best prevention is to water the soil, not the leaves, and to make sure the plant has good air circulation.
The Secret to Delicious Zucchini: Harvest them when they are small and tender! Don’t wait for them to turn into giant, watery baseball bats. A zucchini that’s about 6-8 inches long will have the best flavor and texture. Check your plants every single day, because they grow incredibly fast.
9. Peas: The Sweet, Cool-Season Delight
Peas are one of my favorite things to grow in the spring. There’s something so satisfying about popping open a fresh pod and eating the sweet, crunchy peas right there in the garden. They are a cool-season crop and a sign that the garden is waking up after winter.

Why They Are So Rewarding: They are fun to watch climb, they improve the soil (just like beans!), and the harvest is absolutely delicious. They are also a fantastic project to do with children.
My Favorite Types: ‘Sugar Snap’ peas are my top choice. They have a fat, edible pod with sweet peas inside—you eat the whole thing. ‘Snow Peas’ have a flat, edible pod. ‘Shelling Peas’ (or English peas) are the ones where you just eat the peas from inside the pod.
My Tips for a Great Pea Harvest:
- Plant Them Early: Peas love the cold. I plant my seeds directly in the garden as soon as the soil can be worked in early spring, often 4-6 weeks before the last frost. They also love a second planting in the fall.
- Give Them Something to Climb: Even dwarf varieties appreciate a little support. A simple trellis made of string and bamboo stakes or a section of chicken wire is perfect.
- Don’t Over-Fertilize: Peas create their own nitrogen, so they don’t need rich soil or a lot of fertilizer. Too much nitrogen will give you lots of leaves but very few pea pods.
Harvesting for Sweetness: Harvest the pods frequently. The more you pick, the more the plant will produce. Pick them in the morning when they are crisp and full of sugar. If you wait too long, the sugars will turn to starch and they won’t taste as sweet.
10. Onions: The Low-Maintenance Kitchen Staple
I used to be intimidated by the idea of growing onions, thinking they took forever and were complicated. Then I discovered “onion sets,” and everything changed. These are tiny, partially grown onion bulbs that you plant instead of seeds, and they are practically foolproof. Growing your own onions means you’ll never run out of this essential kitchen ingredient.

Why It’s Perfect for Beginners: When you start from “sets,” onions are incredibly low-maintenance. You plant them and, for the most part, forget about them until it’s time to harvest. They also take up very little space for the value they provide.
Favorite Varieties: This depends on where you live (“long-day” vs. “short-day” varieties), but for a simple start, ask your local garden center for yellow or red onion sets that are suitable for your region.
Step-by-Step Growing Guide:
- Best time to plant: Plant onion sets in early spring as soon as the soil can be worked.
- Sunlight needs: They need full sun to form large bulbs.
- Soil and Containers: They grow in almost any soil, but they prefer well-drained soil. They can be grown in containers, but make sure the pot is wide enough to give them space.
- Watering: Water them regularly during the growing season, but reduce watering once the tops start to yellow and fall over this is a sign they are maturing and getting ready for harvest.
- Crucial Tip – They Hate Weeds: Onions have a very shallow root system and they absolutely despise competition. My number one rule for a successful onion crop is to keep the bed completely free of weeds.
Smart Harvest: When the green tops of the onions turn yellow and begin to fall over, it’s time to harvest. Gently pull them from the soil and let them “cure” by laying them out in a warm, dry, shady spot for a week or two until the outer skins are papery and dry. This curing process is what allows them to be stored for months.
11. Bell Peppers: A Splash of Color and Crunch

There’s something special about walking out to your patio and picking a bright red, yellow, or orange bell pepper. Growing your own colorful bell peppers is so rewarding, and they are much easier than you might think. They love a hot, sunny spot in the garden. I grow mine in large pots on my patio, and they produce an amazing number of peppers all summer long.
Perfect for Beginners: They are relatively compact plants and do exceptionally well in containers. They are also less prone to pests and diseases than some other summer vegetables.
Varieties: For beginners in containers, I recommend varieties like ‘California Wonder’ (a classic blocky pepper) or ‘Sweet Banana’ which is very productive.
Now Growing Guide:
- Best time to plant: Peppers are true heat-lovers. Don’t rush to plant them outside. I always wait until the nighttime temperatures are consistently above 55°F (13°C).
- Sunlight needs: Give them the sunniest spot you have at least 6-8 hours of direct sun is essential.
- Soil and Containers: Use a large pot (at least 5 gallons) for each plant to give the roots plenty of space. Use a high-quality potting mix and add some compost.
- Watering: Keep the soil consistently moist, especially once they start to flower and produce fruit.
- A Little Support: Once the plants start to get heavy with peppers, the branches can easily break. I use a simple bamboo stake or a small tomato cage to give them some support.
Pro Harvesting: You can harvest bell peppers when they are green, but the magic happens if you have a little patience. If you leave them on the plant, they will ripen to their final color (red, yellow, or orange). This not only makes them prettier but also much sweeter and higher in vitamins. Use a pair of scissors or pruners to cut them off the plant to avoid damaging the branches.
My Final Thoughts for You
See? Growing your own vegetables doesn’t have to be some grand, complicated affair. It’s not about having a mythical “green thumb”; it’s about starting small, choosing the right plants, and learning as you go. Every single one of these 11 vegetables is a winner for a beginner’s garden.
Don’t be afraid to make mistakes. I promise you, you will. My first year, I drowned my lettuce and completely forgot to water my beans for a week. It happens! That’s how you learn. But the joy of walking outside, into your own little green space, and picking something you grew with your own hands for your dinner table is one of the most satisfying feelings in the world.
Start with just one or two things from this list. A single pot of lettuce or a container of radishes is a perfect beginning. You’ve got this.