10 Simple Garden Hacks with Household Items
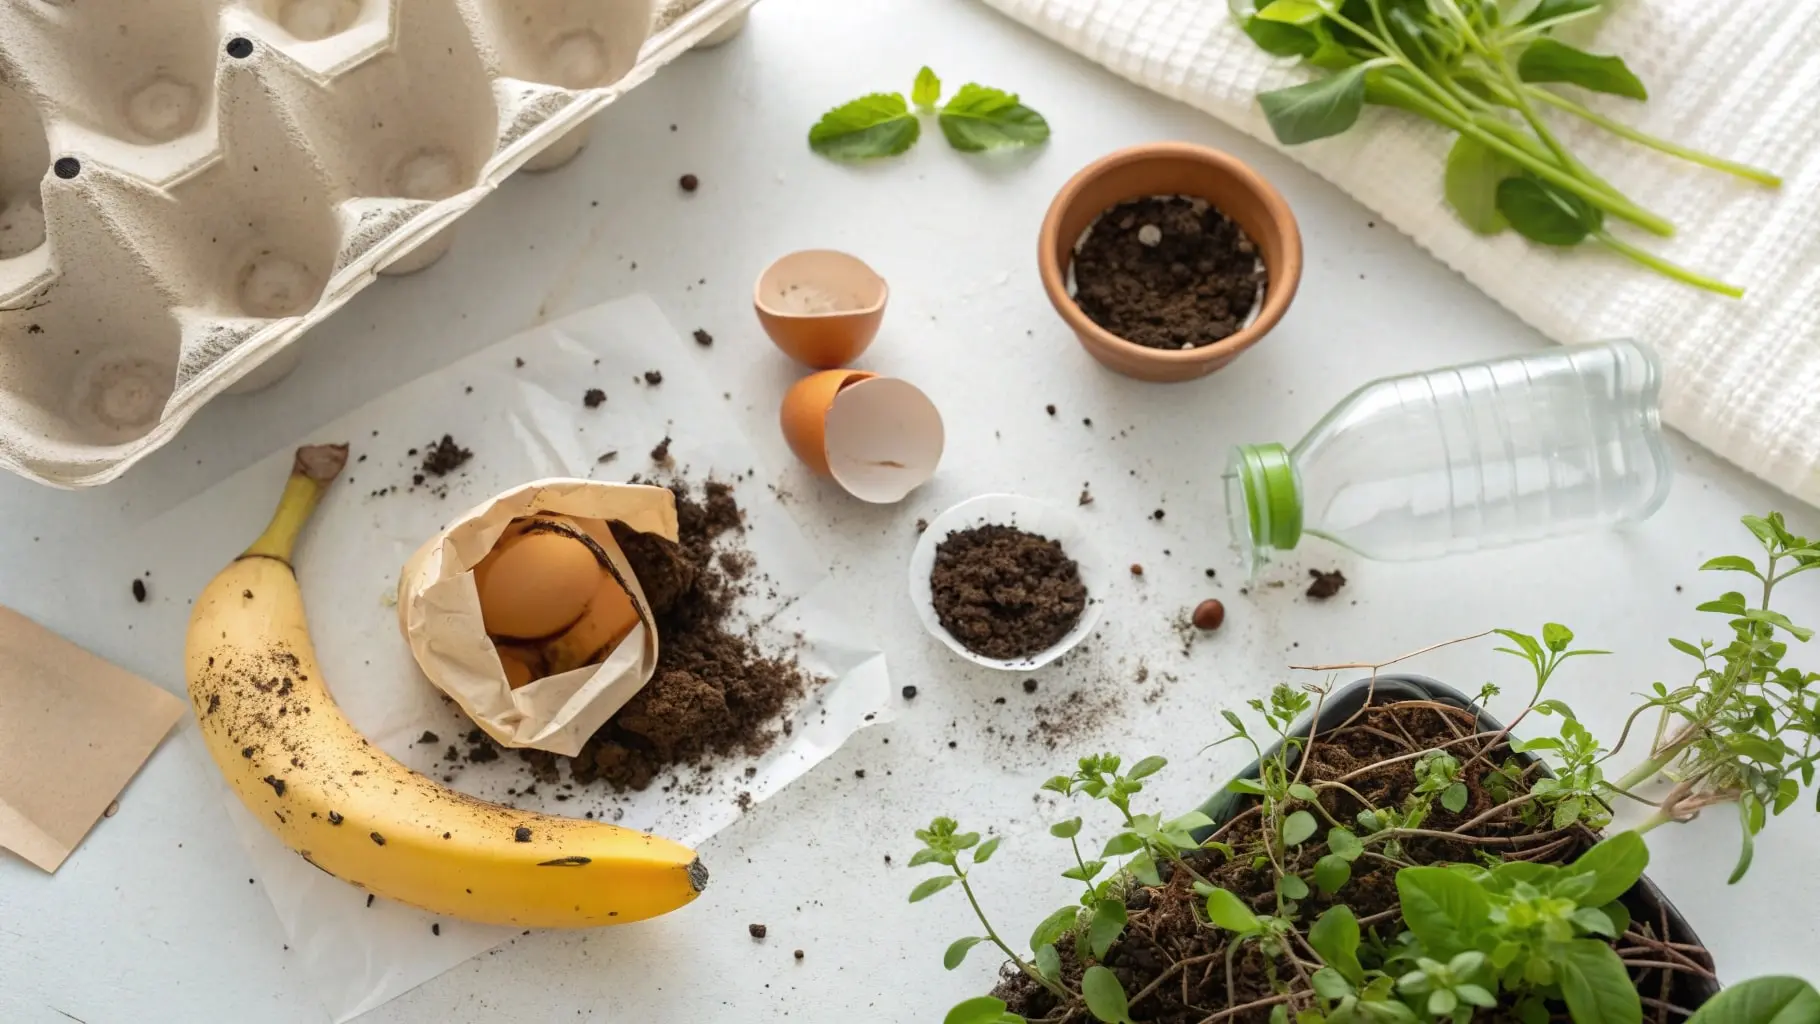
Gardening is often portrayed as a hobby that requires a trip to the store for expensive tools, chemical fertilizers, and a constant stream of investment. But what if the secret to a healthier, more vibrant garden is already sitting in your kitchen, your recycling bin, or your pantry? The truth is, you can grow a thriving garden by being resourceful, using simple things you already have at home.
From the eggshells you throw away after breakfast to the old newspapers piling up in the garage, many everyday household items can be transformed into powerful and effective gardening solutions. These clever DIY gardening ideas don’t just save you a significant amount of money; they also dramatically reduce waste, making your garden more eco-friendly and sustainable. It’s a win-win for your wallet and the planet.
In this comprehensive guide, we’ll explore 10 proven simple garden hacks with household items. These tricks will help you improve your soil quality, protect your precious plants, control pests naturally, and grow healthier, more abundant flowers and vegetables.
- Hack #1: Eggshells for Calcium-Rich Soil and Pest Control
- Hack #2: Used Coffee Grounds to Nourish Your Soil
- Hack #3: Banana Peels for a Potassium Power-Up
- Hack #4: Vinegar as a Natural, Potent Weed Killer
- Hack #5: Plastic Bottles for DIY Drip Irrigation
- Hack #6: Cinnamon Powder for Fungus and Seedling Protection
- Hack #7: Newspaper Mulch for Superior Weed Prevention
- Hack #8: Epsom Salt for a Magnesium Boost
- Hack #9: Kitchen Scraps for "Black Gold" Compost
- Hack #10: Old Forks and Pinecones as Pest Deterrents
- Bonus Hack: Reuse Nutrient-Rich Cooking Water
Hack #1: Eggshells for Calcium-Rich Soil and Pest Control
The Science Behind It (Why It Works)
Eggshells are a powerhouse of calcium carbonate, a crucial nutrient that strengthens the cell walls of plants. Strong cell walls make plants more resilient to diseases and stress. Calcium is especially vital for fruiting plants like tomatoes, peppers, and eggplants, as it is the key to preventing the dreaded “blossom-end rot”—that ugly, black, sunken spot that can ruin your harvest.

Step-by-Step: How to Use Eggshells
- Collect & Clean: Start collecting eggshells from your kitchen. It’s important to rinse them thoroughly under running water to remove any egg residue, which could attract pests.
- Dry Them Out: Allow the clean shells to dry completely. You can leave them on a sunny windowsill for a day or, for a quicker and more sterile result, bake them in an oven at a low temperature (200°F or 95°C) for 10-15 minutes.
- Crush or Grind: Once dry and brittle, crush them into small, sharp pieces with your hands or a rolling pin. For a faster-acting fertilizer, grind them into a fine powder using a coffee grinder or blender.
- Apply to Your Garden: Sprinkle the crushed eggshells in a circle around the base of your plants. For the powdered version, you can mix it directly into the soil before planting or add it to your watering can.
Extra Benefits & Best Plants
- Natural Slug and Snail Deterrent: The sharp edges of crushed eggshells create an uncomfortable barrier that soft-bodied pests like slugs and snails hate to cross.
- Compost Booster: Adding eggshells to your compost pile helps balance its acidity and adds valuable minerals.
- Best For: Tomatoes, peppers, eggplants, squash, broccoli, cauliflower, and roses.
Hack #2: Used Coffee Grounds to Nourish Your Soil
The Science Behind It (Why It Works)
Don’t throw away those used coffee grounds! They are rich in nitrogen, one of the three primary macronutrients (the “N” in N-P-K fertilizer) essential for lush, green, leafy growth. They also improve soil structure (tilth), making heavy clay soils lighter and helping sandy soils retain more moisture. A common myth is that used grounds are highly acidic; in reality, the brewing process neutralizes most of the acid, leaving them with a near-neutral ph.

Step-by-Step: How to Use Coffee Grounds
- As a Top Dressing: Sprinkle a thin layer of used, cool coffee grounds directly onto the soil around your plants and gently work it in. Caution: Use it sparingly; a thick layer can become compacted and prevent water from penetrating the soil.
- In the Compost Bin: Coffee grounds are considered a “green” material in composting and are fantastic for speeding up the decomposition process.
- As a Pest Repellent: The strong smell and texture can help deter pests like ants, slugs, and even cats from using your garden bed as a litter box.
Extra Benefits & Best Plants
- Earthworm Magnet: Earthworms love coffee grounds, and their presence is a sign of incredibly healthy soil.
- Best For: While nearly all plants benefit from the nitrogen, acid-loving plants like blueberries, azaleas, rhododendrons, and hydrangeas particularly appreciate the gentle acidity that coffee grounds can provide over time.
Hack #3: Banana Peels for a Potassium Power-Up
The Science Behind It (Why It Works)
Banana peels are another piece of kitchen “trash” that is actually treasure for your garden. They are packed with potassium, a vital nutrient that plays a key role in almost every aspect of plant health. Potassium aids in photosynthesis, helps transport water and nutrients, and is absolutely essential for producing strong flowers and flavorful fruits. Peels also contain smaller amounts of phosphorus, magnesium, and calcium.

Step-by-Step: How to Use Banana Peels
- Chop and Bury: The simplest method is to chop a banana peel into small, one-inch pieces. Bury these pieces 1-2 inches deep in the soil near the base of your plants. This prevents them from attracting pests as they decompose.
- Make “Banana Peel Tea”: For a faster-acting liquid fertilizer, soak a few banana peels in a jar of water for 2-3 days. The water will absorb the nutrients. Remove the peels and use this “tea” to water your plants.
- Dry and Grind: You can also dry the peels (in the sun or a low oven) until they are crispy, then grind them into a powder to mix into your soil.
Extra Benefits & Best Plants
- Aphid Deterrent: Burying peels at the base of plants like roses is said to deter aphids.
- Best For: Roses are famous for loving banana peels. Fruiting plants like tomatoes, peppers, and fruit trees also benefit greatly from the potassium boost.
Hack #4: Vinegar as a Natural, Potent Weed Killer
The Science Behind It (Why It Works)
Regular household white vinegar contains acetic acid, which is a powerful “desiccant.” This means it works by drawing all the moisture out of the plant’s cells, causing the foliage to dry up, wither, and die. It’s an effective, non-toxic alternative to chemical herbicides, especially for annual weeds.
Step-by-Step: How to Use Vinegar
- Prepare Your Sprayer: Fill a clean spray bottle with undiluted white vinegar (5% acetic acid). For extra-tough weeds, you can add a teaspoon of dish soap, which helps the vinegar stick to the leaves.
- Choose the Right Day: Apply on a warm, sunny, and calm day. The sun helps accelerate the drying process.

- Spray Carefully: Spray the vinegar directly onto the leaves of the weeds you want to kill, saturating them completely.
- Be Patient and Repeat: You should see results within 24 hours. Stubborn perennial weeds may require a second application.
CRITICAL CAUTION
Vinegar is non-selective, meaning it will kill any plant it touches, including your prized flowers and vegetables. Never spray it near plants you want to keep. It is best used for weeds growing in cracks in your driveway, sidewalks, or patio, or in an area you are clearing for a new garden bed.
Hack #5: Plastic Bottles for DIY Drip Irrigation
The Science Behind It (Why It Works)
This is one of the most useful eco-friendly garden hacks. A repurposed plastic bottle can be turned into a highly efficient, slow-release watering system. This method delivers water directly to the plant’s root zone, which encourages deeper root growth, reduces water waste from evaporation, and prevents the “boom and bust” cycle of overwatering and then letting the soil dry out.

Step-by-Step: How to Make a Bottle Irrigator
- Select a Bottle: A 1-liter or 2-liter plastic soda bottle works perfectly.
- Poke the Holes: Take the bottle cap and carefully poke 3-5 small holes in it using a nail and hammer or a small drill bit.
- Bury the Bottle: Dig a hole next to the plant you want to water, deep enough to bury the bottle about two-thirds of the way.
- Fill and Forget: Fill the bottle with water, screw the cap back on, and place it upside down in the hole. The water will now drip out slowly and steadily, providing consistent moisture to the roots.
Extra Benefits & Best For
- Vacation Watering: This is a lifesaver for keeping plants hydrated when you’re away from home for a few days.
- Best For: Thirsty plants like tomatoes and squash in vegetable beds, container gardens, and gardens in hot, dry climates.

Best Practices for Using Household Garden Hacks
- Always Clean Food Waste: To avoid attracting rodents or unwanted insects, always rinse items like eggshells and banana peels before use. Drying them also helps.
- Know Your Soil: Some hacks, like adding coffee grounds, can slightly alter soil pH over time. It’s a good idea to rotate your hacks and observe how your plants respond.
- Patience is Key: Natural solutions often work more slowly than chemical ones. Be consistent and patient.
- Document Your Results: Keep a small garden journal. Note which easy gardening tips and hacks work best for your specific plants and climate.
Hack #6: Cinnamon Powder for Fungus and Seedling Protection
The Science Behind It (Why It Works)
Cinnamon is more than just a fragrant spice; it’s a potent natural fungicide. It contains a compound called cinnamaldehyde, which has powerful antifungal and antibacterial properties. This makes it incredibly effective at preventing “damping-off,” a common and devastating fungal disease that attacks young seedlings right at the soil line, causing their stems to rot and collapse. Applying cinnamon creates an inhospitable environment for the fungus to grow.
Step-by-Step: How to Use Cinnamon Powder
- For Seedlings: After planting your seeds, lightly sprinkle a fine layer of cinnamon powder over the surface of the soil in your seedling trays. This acts as a preventative measure against damping-off.
- For Cuttings: When taking cuttings from plants to propagate them, dip the cut end in cinnamon powder before planting. It acts as a natural rooting hormone, encouraging root development while protecting the fresh cut from fungal infections.
- For Indoor Plant Mold: If you notice a bit of fuzzy mold growing on the topsoil of your houseplants (which is common in humid conditions), simply sprinkle a layer of cinnamon on top. It will stop the mold’s growth and often get rid of it.
Extra Benefits & Best For
- Ant Repellent: Ants and gnats dislike the strong smell of cinnamon. A line of cinnamon powder can deter them from entering your home or crawling up your potted plants.
- Best For: Young seedlings of any variety, plant cuttings, and houseplants susceptible to soil mold.
Hack #7: Newspaper Mulch for Superior Weed Prevention
The Science Behind It (Why It Works)
This technique, often called “sheet mulching,” is a secret weapon for low-maintenance gardening. A layer of old newspapers acts as a biodegradable light barrier. It blocks the sunlight that dormant weed seeds in the soil need to germinate and grow. At the same time, the porous nature of newspaper allows essential air and water to penetrate through to the soil and plant roots, unlike plastic sheeting which can suffocate the soil.

Step-by-Step: How to Use Newspaper Mulch
- Prepare the Area: Lightly water the garden bed you want to mulch. This helps the newspaper stick and stay in place.
- Lay the Newspaper: Place 3-4 layers of black-and-white newspaper sheets over the soil, overlapping the edges by a few inches so there are no gaps for weeds to peek through. Crucial Tip: Avoid using glossy, colored ad inserts or magazine pages, as their inks can sometimes contain heavy metals.
- Water it Down: Thoroughly wet the newspaper layer. This helps it mold to the ground and begin the decomposition process.
- Cover with Organic Mulch: To hold the newspaper in place and make it look aesthetically pleasing, cover it with a 2-3 inch layer of organic mulch like straw, shredded leaves, or wood chips.
Extra Benefits & Best For
- Soil Improvement: As the newspaper and top layer of mulch slowly break down, they add valuable carbon and organic matter to your soil, improving its structure and feeding earthworms.
- Best For: Establishing new garden beds (you can plant directly through it), vegetable patches, and flower borders where weed control is a priority.
Hack #8: Epsom Salt for a Magnesium Boost
The Science Behind It (Why It Works)
First, it’s important to know that Epsom salt is not regular table salt (sodium chloride). It’s a naturally occurring mineral compound of magnesium sulfate. Magnesium is a vital nutrient for plants and is the central atom in every molecule of chlorophyll the green pigment responsible for photosynthesis. A magnesium deficiency can lead to yellowing leaves and stunted growth. Epsom salt provides a readily available source of magnesium, which boosts chlorophyll production and improves a plant’s ability to absorb other essential nutrients like nitrogen and phosphorus.
Step-by-Step: How to Use Epsom Salt
- As a Foliar Spray: This is the fastest way for plants to absorb the nutrients. Dissolve 1-2 tablespoons of Epsom salt in one gallon (approx. 4 liters) of water. Use a spray bottle to mist the leaves of your plants once a month during the growing season.
- As a Soil Drench: Use the same ratio (1-2 tablespoons per gallon of water) and pour it directly onto the soil at the base of your plants instead of your regular watering.
Caution and Best Plants
- Use Appropriately: Only use Epsom salt on plants that are known to be heavy magnesium feeders or if you know your soil is deficient. Overuse can lead to other nutrient imbalances.
- Best For: Plants that are prone to magnesium deficiency, such as tomatoes, peppers, and roses. It often leads to greener leaves, stronger plants, and more prolific blooms.
Hack #9: Kitchen Scraps for “Black Gold” Compost
The Science Behind It (Why It Works)
Composting is the ultimate recycling hack. It’s the natural process of decomposing organic matter—like your kitchen scraps and yard waste into a rich, dark, soil-like substance often called “black gold.” is the secret to creating the healthy, well-draining soil that is the foundation of any successful beginner’s garden. this compost is teeming with beneficial microbes and essential plant nutrients. Adding it to your garden dramatically improves soil fertility, helps clay soil drain better, enables sandy soil to retain water, and reduces the need for any chemical fertilizers.
Step-by-Step: How to Compost
- Collect Your Scraps: Keep a small container with a lid in your kitchen to collect “Green” materials: vegetable peels, fruit scraps, used coffee grounds, and crushed eggshells.
- Balance with “Browns”: A healthy compost pile needs a balance of nitrogen-rich “Greens” and carbon-rich “Browns.” For every part of kitchen scraps you add, try to add two parts of “Browns” like dried leaves, shredded newspaper, or cardboard.
- Maintain and Turn: Keep the compost pile moist (like a damp sponge) but not waterlogged. Turn the pile with a garden fork every week or two to aerate it, which speeds up decomposition.
- Harvest: Your compost is ready when it’s dark, crumbly, and has a pleasant, earthy smell. This can take anywhere from a few months to a year.
What NOT to Compost
- Avoid adding meat, fish, dairy products, and oily foods, as these can create foul odors and attract pests like rodents.
Hack #10: Old Forks and Pinecones as Pest Deterrents

The Science Behind It (Why It Works)
This simple physical deterrent works by making your garden bed an uncomfortable and undesirable place for small animals to walk or dig. Critters like squirrels, chipmunks, cats, and even some birds often dig in freshly tilled soil to look for food or to use it as a litter box. Placing a lattice of poky objects on the surface makes it difficult and unpleasant for them to find a footing.
Step-by-Step: How to Use Them
- Fork Barrier: Take old plastic or metal forks and stick them tines-up into the soil around your delicate seedlings or newly planted seeds. Space them every 4-6 inches to create an effective grid.
- Pinecone Mulch: Collect pinecones and lay them on the surface of the soil in your potted plants or garden beds. Their spiky, uneven texture is a great natural deterrent.
- Twig Lattice: Lay a network of small, twiggy branches over your seedbeds. The seedlings will grow up through the gaps, but the animals will be discouraged from digging.
Extra Benefits & Best For
- Aesthetic Appeal: A layer of pinecones can actually look quite decorative as a natural mulch.
- Best For: Protecting newly sown seedbeds, small seedlings, and potted plants that are frequent targets for digging animals.
Bonus Hack: Reuse Nutrient-Rich Cooking Water
Instead of pouring the water you used to boil vegetables, pasta, or eggs down the drain, let it cool to room temperature and use it to water your plants. This water is filled with leached-out nutrients and minerals like calcium and starch, providing a mild, free fertilizer for your garden. Important: Only use water that is unsalted!
Conclusion: The Resourceful Gardener’s Secret Weapon
Gardening doesn’t have to drain your bank account. As these 10 simple garden hacks prove, your home is already a treasure trove of powerful tools for plant care. By reimagining everyday items, you can create a garden that is not only beautiful and productive but also sustainable and deeply satisfying.
From eggshell fertilizers that prevent disease to plastic bottle irrigation systems that conserve water, these garden hacks with household items empower you to be a more creative and eco-conscious gardener. You’ll save money, reduce your household waste, and enjoy the immense satisfaction that comes from nurturing your garden with things you already have.
So, the next time you peel a banana, brew a pot of coffee, or finish reading the newspaper, take a moment to see its potential. You might just be holding the secret ingredient to your healthiest garden yet.